

Prep Time: 45 minutes | Lamination and Resting: 8 to 12 hours | Proof Time: 2 to 3 hours | Bake Time: 20 minutes | Total Time: 2 days (mostly hands-off) | Makes: 12 croissants
I want to be honest with you from the very beginning: homemade croissants are the most technically involved recipe on this site. They take two days, require patience, and demand that you respect the process rather than rush it.
I also want to tell you that the first time you pull a tray of your own croissants from the oven — deeply golden, shattering into hundreds of paper-thin layers when you break them open, filling the entire kitchen with a warm, buttery smell that makes everyone come running — you will understand immediately why people dedicate years to mastering this pastry.
The lamination process sounds intimidating. It is not complicated once you understand what you are doing and why. You are simply creating alternating layers of dough and cold butter by folding and rolling the dough repeatedly, resting it between each fold so the butter stays cold and distinct. Those layers — hundreds of them — puff apart in the oven and create the shatteringly flaky exterior that defines a great croissant.
This recipe walks you through every single step with complete clarity. Follow the tips, respect the resting times, and your first batch of homemade croissants will be better than most bakeries near you.

Homemade Croissants Recipe
What makes this recipe approachable despite the technique is the schedule. Almost all the time is completely hands-off — the dough rests in the refrigerator between folds and overnight before shaping. Your active working time across the two days is probably 90 minutes total. The rest is patience.
I made croissants for years before I truly understood the lamination process — and once it clicked, everything changed. The layers are not magic. They are butter kept cold, folded carefully, and rested properly. That is genuinely all there is to it.
Make these once. Understand the process. The second batch will be better. The third will be extraordinary.
Helpful Reader Reviews
“I was terrified to try this recipe. I followed every single step and tip and the results were absolutely stunning. My family could not believe I made these at home. The best baking project I have ever done.” — Lauren ★★★★★
“Just made these croissants. Best I have ever tasted. So good. The lamination tips were incredibly helpful — my layers were absolutely perfect.” — Alexandra ★★★★★
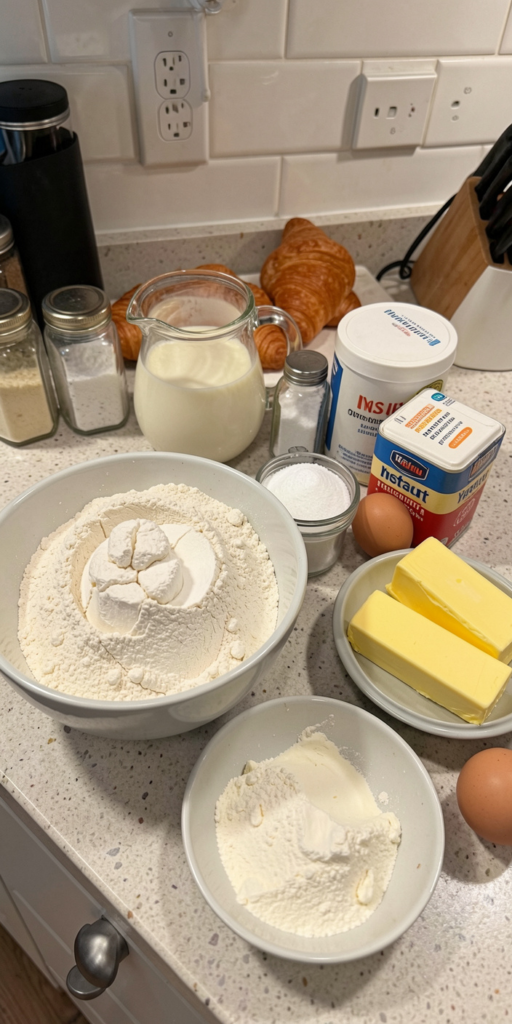
Ingredients for Homemade Croissants
All-Purpose Flour — the correct flour for croissants. All-purpose flour has a moderate protein content that builds just enough gluten to give the dough structure without making it so elastic that it fights you during rolling. Bread flour contains too much protein, builds too much gluten, and makes the dough spring back aggressively during lamination — making the whole process significantly harder and the final texture tougher than it should be.
Whole Milk — adds richness and tenderness to the dough. Use whole milk only — skim or semi-skimmed milk produces a noticeably less rich, less flavorful croissant. Warm the milk gently to about 37°C (99°F) before adding — too cold and the yeast will not activate, too hot and it kills the yeast.
Sugar — a small amount feeds the yeast during fermentation and adds a gentle sweetness to the dough that balances the richness of all that butter.
Salt — controls the yeast fermentation rate and adds flavor. Never add salt in direct contact with the yeast at the start of mixing — salt kills yeast on contact. Add them to opposite sides of the bowl.
Instant Yeast — provides the leavening. Instant yeast (also called rapid-rise yeast) can be added directly to the dry ingredients without being proofed in water first. Active dry yeast requires proofing in warm liquid first — if using active dry, dissolve it in the warm milk with a pinch of sugar and let it sit 5 minutes until foamy before adding to the flour.
Unsalted Butter (for the dough) — a small amount of soft butter goes directly into the dough and makes it pliable and smooth. This is separate from the lamination butter.
Unsalted Butter (for lamination) — the most critical ingredient in the entire recipe. Use the best quality European-style unsalted butter you can find — Kerrygold, Plugrá, or Président are widely available and produce significantly better results than standard American butter. European butter has a higher fat content (84% vs 80%) and lower water content, which means it stays more pliable during rolling and produces crisper, more defined layers. The quality of this butter is directly and immediately tasted in the finished croissant.
Egg — one egg whisked with a tablespoon of milk creates the egg wash applied before baking. This gives the croissants their characteristic deep, mahogany-golden color and slight sheen.
Ingredients
Makes 12 croissants
For the Dough:
- 3 cups (360g) all-purpose flour, plus more for dusting
- 1 cup (240ml) whole milk, warmed to 37°C (99°F)
- 3 tbsp (38g) granulated sugar
- 1½ tsp fine sea salt
- 2¼ tsp (7g / 1 packet) instant yeast
- 2 tbsp (28g) unsalted butter, softened
For the Lamination Butter Block:
- 1 cup (225g) high-quality European-style unsalted butter, cold
For the Egg Wash:
- 1 large egg
- 1 tbsp whole milk
Equipment You Will Need
- Stand mixer with dough hook (or large mixing bowl and hands)
- Rolling pin — a long, straight French rolling pin gives the most control
- Ruler — for precise measurements during lamination
- Plastic wrap — for wrapping the dough and butter block during resting
- Baking sheets lined with parchment paper
- Pastry brush — for egg wash
- Instant-read thermometer — for proofing temperature
Croissant Baking Schedule
The most common question about homemade croissants is when to do what. Here is the clearest possible timeline:
Day One Evening (about 30 minutes active):
- Mix and knead the dough
- First refrigerator rest overnight
Day Two Morning (about 60 minutes active across the day):
- Make the butter block
- Complete 3 lamination folds with refrigerator rests between each
- Final refrigerator rest
Day Two Afternoon/Evening:
- Shape the croissants
- Final proof (2 to 3 hours)
- Egg wash and bake
How to Make Homemade Croissants
Day One — Make the Dough
In the bowl of a stand mixer fitted with a dough hook, combine the flour, sugar, and salt. Add the instant yeast to one side of the bowl — keep it away from the salt at first.
Pour in the warm milk and add the softened butter. Mix on low speed for 2 minutes until the dough just comes together, then increase to medium speed and knead for 5 to 7 minutes until the dough is smooth and slightly elastic. It should be soft but not sticky — it should pull away from the bowl sides cleanly.
Pro Tip: Do not over-knead the croissant dough. You want just enough gluten development to hold the layers together during lamination — not a fully developed, tight gluten network. The dough should feel smooth and pliable, not springy and resistant. If it keeps springing back when you stretch it, it has been kneaded too long.
Shape the dough into a flat rectangle — not a ball — about 2cm thick. A flat rectangle chills faster and more evenly than a ball, and it is already the right shape for starting lamination. Wrap tightly in plastic wrap and refrigerate overnight, or for at least 8 hours.
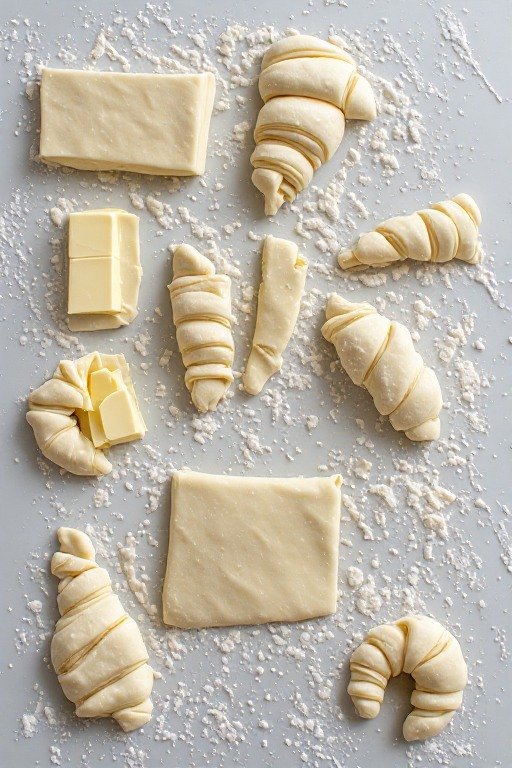
Day Two — Make the Butter Block
Remove the cold butter from the refrigerator. Place it between two sheets of parchment paper. Using a rolling pin, beat and then roll the butter into a flat square approximately 18cm x 18cm (7 x 7 inches). The butter should be pliable — it bends without cracking — but still cold and firm. This is called the beurrage, and getting the consistency right is the most critical step in the entire lamination process.
If the butter cracks when you fold it, it is too cold — let it sit at room temperature for 5 to 10 minutes. If it is soft and greasy, refrigerate it for 10 minutes. The ideal temperature for lamination butter is about 15°C to 17°C (59°F to 63°F) — cold enough to stay firm but warm enough to be flexible.
Keep the butter block in the refrigerator while you roll out the dough.
Lamination — First Fold (Letter Fold)
Remove the dough from the refrigerator. On a lightly floured surface, roll it into a rectangle approximately 38cm x 20cm (15 x 8 inches).
Place the cold butter block in the center of the dough rectangle. Fold the sides of the dough over the butter block like an envelope, completely encasing it. Pinch the edges firmly to seal so no butter can escape.
Now roll the dough away from you in one direction — always away from you, never back and forth — into a long rectangle approximately 60cm x 20cm (24 x 8 inches). Work gently and steadily. If the butter starts to break through the dough surface, stop and refrigerate for 15 minutes before continuing.
Fold the dough in thirds like a business letter — bottom third up, top third down over it. This is Turn 1. Wrap in plastic wrap and refrigerate for 30 to 45 minutes.
Lamination — Second and Third Folds
Remove the dough from the refrigerator. Position it so the fold is on your left, like a book spine. Roll into a long rectangle again and fold in thirds. This is Turn 2. Wrap and refrigerate 30 to 45 minutes.
Repeat for Turn 3. After Turn 3, wrap and refrigerate for at least 1 hour, or overnight.
After 3 letter folds, the dough contains 27 distinct layers of butter — the foundation of those hundreds of paper-thin layers that make croissants extraordinary.
Pro Tip: The most common lamination mistake is working with dough or butter that is too warm. Both the dough and the butter must stay cold and firm throughout every fold. The moment you feel the butter starting to feel soft or greasy under your hands, stop, wrap everything up, and refrigerate for 20 minutes before continuing. Warm butter incorporates into the dough rather than staying in distinct layers — and once that happens, the layers are gone and cannot be recovered.
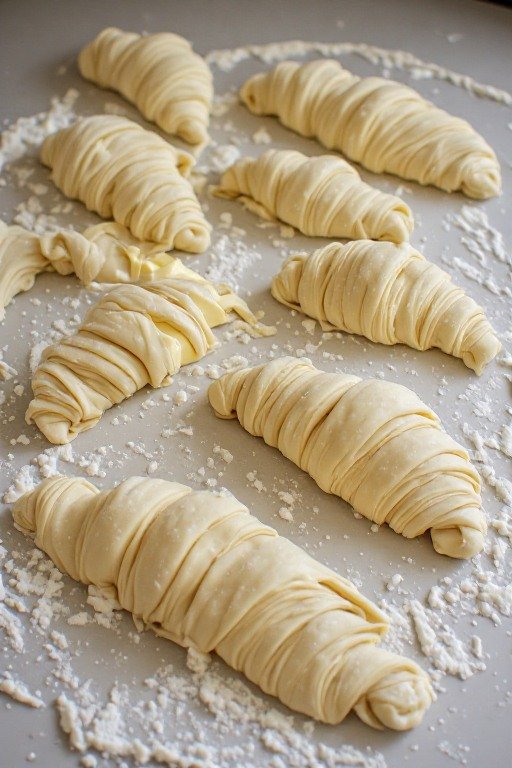
Shape the Croissants
Remove the laminated dough from the refrigerator. On a lightly floured surface, roll it into a large rectangle approximately 50cm x 35cm (20 x 14 inches) and about 4mm (⅛ inch) thick.
Using a ruler and a sharp knife or pizza cutter, cut the dough into triangles with a base of about 10cm (4 inches) and long sides of about 18cm (7 inches). Before cutting, lift the dough and let it relax back onto the surface — this releases any tension and prevents the croissants from distorting during shaping.
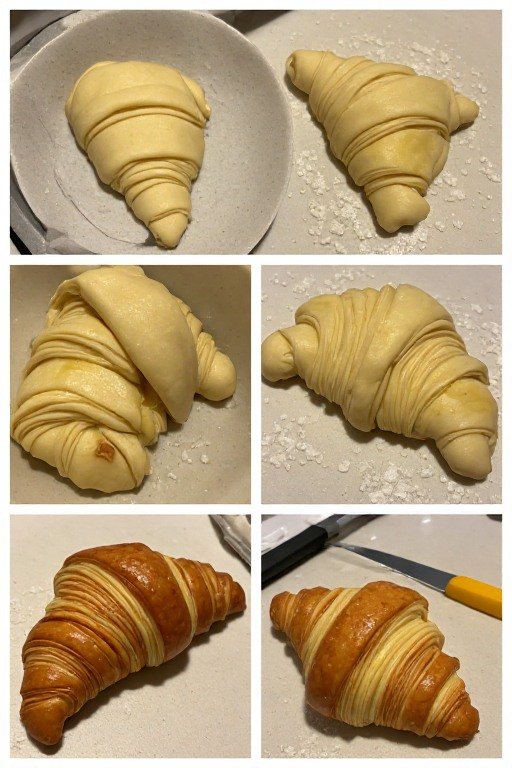
Working one triangle at a time, make a small 1cm notch in the center of the base. Gently stretch the triangle to elongate it slightly. Starting from the base, roll toward the tip with firm, even pressure — keeping the roll tight throughout. Tuck the tip underneath the rolled croissant so it does not unroll during proofing and baking.
Curve the ends of each croissant gently toward each other to create the classic crescent shape. Place on parchment-lined baking sheets with the tip side down, spacing them at least 5cm (2 inches) apart.
Final Proof
Cover the shaped croissants loosely with plastic wrap — do not press down, just drape it over. Proof at room temperature, between 24°C and 27°C (75°F and 80°F), for 2 to 3 hours.
The croissants are ready to bake when they have roughly doubled in size and look visibly puffy. If you gently shake the baking sheet, they should wobble slightly — that jiggle tells you the layers inside are still distinct and cold butter has not melted into the dough. If they do not wobble, they may be slightly overproofed.
Do not proof croissants somewhere too warm. If the proofing environment is above 27°C (80°F), the butter in the layers begins to melt before the oven can set the structure. The result is flat, greasy croissants without defined layers rather than the shattering, puffed beauties you are working toward.
Egg Wash and Bake
Preheat the oven to 200°C (400°F). While the oven heats, whisk together the egg and milk for the egg wash.
Using a pastry brush, apply a thin, even layer of egg wash to the surface of each croissant. Be thorough but gentle — apply it to the top and visible sides, but do not let egg wash drip onto the cut edges of the croissant. Egg wash on the cut edges seals the layers together and prevents them from opening up properly during baking.
Bake for 18 to 22 minutes until deeply golden brown — a proper croissant should be an almost mahogany amber color on top, not pale gold. The deep color is not burning — it is caramelization and it means maximum flavor and maximum crunch.
Let the croissants cool on the baking sheet for at least 10 minutes before eating. This resting time allows the layers to set properly — a croissant eaten directly from the oven is still setting up inside and will not have its best texture.
How Do I Know When Croissants Are Ready to Bake?
A properly proofed croissant has roughly doubled in size from when it was shaped. It looks visibly puffy and pillowy rather than the compact, dense roll it was when first shaped. When you gently shake the baking sheet, the croissants should wobble and jiggle — this movement tells you the interior layers contain cold, solid butter that is still distinct and has not yet melted.
If the croissants look puffy but do not wobble at all, they may be slightly overproofed. Bake them immediately — further proofing will only worsen the situation.
Tips for the BEST Homemade Croissants
Keep everything cold throughout lamination — The entire principle of croissant making is keeping butter layers distinct from dough layers. The moment either gets warm, the butter softens and begins incorporating into the dough. Work quickly, rest frequently, and refrigerate at the first sign of any butter softness. Cold hands, cold counter, cold rolling pin if possible.
Use the best butter you can find — European-style butter with 84% fat content produces noticeably superior croissants to standard 80% fat American butter. The extra fat, less water difference is immediately visible in the layers and immediately tasted in the flavor. This is not an area to economize.
Never rush the resting periods — The refrigerator rests between folds are not optional waiting time. They are actively improving the croissant. The cold firms the butter back to the right consistency, relaxes the gluten so it stops fighting the rolling pin, and allows everything to settle back into distinct layers. Rushing produces tough, difficult-to-roll dough and butter that smears rather than layers.
Roll in one direction only — Always roll the dough away from you, not back and forth. Rolling back and forth applies pressure from both sides and can tear the butter layers or push them into the dough rather than keeping them distinct.
Cut with a sharp knife, no dragging — When cutting the triangles, press straight down with a sharp knife or pizza cutter. Dragging the knife pulls the layers apart and destroys the edges. One clean, confident downward cut per line.
Apply egg wash carefully — Keep egg wash off the cut edges of the croissant. Egg wash on those edges seals the layers together and prevents the dramatic opening and puffing that creates the honeycomb interior of a great croissant.
Can I Freeze Croissant Dough?
Yes — and this is one of the most practical things about this recipe for home bakers. After completing all three lamination folds, the dough can be frozen for up to 1 month. Wrap tightly in plastic wrap and then in foil. Thaw overnight in the refrigerator, then shape, proof, and bake as directed.
You can also freeze shaped, unbaked croissants after the final shaping but before proofing. Freeze on the baking sheet until solid, then transfer to a zip-lock bag. The night before you want to bake, transfer to a parchment-lined baking sheet and refrigerate overnight. Remove from the refrigerator 2 to 3 hours before baking for the final proof, then egg wash and bake as directed.
This freezer method means you can have fresh-baked croissants on a Wednesday morning with almost no effort on the day itself.
Make-Ahead and Storage
Make ahead — The entire recipe is designed for advance preparation. The dough rests overnight in the refrigerator after mixing and again after lamination. You can pause after any lamination fold and refrigerate the dough for up to 2 days before continuing. This flexibility makes it possible to fit croissant making into a real, busy life rather than requiring an uninterrupted weekend day.
Storing baked croissants — Freshly baked croissants are at their peak the day they are baked. Store in a paper bag or loosely covered at room temperature for up to 2 days. Do not store in plastic — plastic traps moisture and softens the crust. Do not refrigerate — cold makes croissants stale and dense.
Reheating — Warm day-old croissants in a 175°C (350°F) oven for 4 to 5 minutes. They revive remarkably well and the crust becomes crispy again almost as good as fresh. Do not microwave — it makes them rubbery and destroys the crust completely.
Freezing baked croissants — Cool completely, wrap individually in plastic wrap and then in foil, and freeze for up to 1 month. Reheat from frozen at 175°C (350°F) for 10 to 12 minutes until heated through and the crust is crispy again.
Common Questions
Why did my croissants not have visible layers? The butter melted into the dough during lamination rather than staying in distinct layers. This happens when either the dough or butter gets too warm during the folding process. The fix is to work faster and refrigerate more frequently — at the first sign of any butter softness, stop and refrigerate for 20 minutes before continuing.
Why are my croissants flat and dense instead of puffed? Either the yeast was not active, the croissants were overproofed so the butter melted before baking, or the oven temperature was too low. Check that your yeast is fresh. Make sure the proofing environment is not too warm. Ensure your oven is fully preheated to 200°C (400°F) before the croissants go in.
Why did the butter leak out during baking? The croissants were overproofed — the butter warmed past its melting point before the dough structure set in the oven. Proof at a cooler temperature, check for the wobble test, and bake as soon as they are properly proofed.
Can I make croissants without a stand mixer? Yes — mix the dough by hand in a large bowl and knead on a lightly floured surface for 8 to 10 minutes until smooth. The result is identical. The stand mixer simply saves effort on the initial dough mixing, which is the only step it is used for.
Is it normal for some butter to melt out during baking? A small amount of butter leaking onto the baking sheet is completely normal and not a sign of failure. The baking sheet should have a little pool of butter under the croissants — this is the excess butter that did not absorb into the dough. It is different from the catastrophic leakage that comes from overproofing, which produces flat, greasy croissants rather than puffed ones.
Nutritional Information (Per Croissant, Approximate)
| Nutrient | Amount |
|---|---|
| Calories | 310 kcal |
| Total Fat | 19g |
| Saturated Fat | 12g |
| Carbohydrates | 30g |
| Protein | 5g |
| Sugar | 4g |
| Sodium | 280mg |
| Cholesterol | 75mg |
Values are approximate per croissant based on 12 croissants. Values will vary based on specific butter brand and exact flour measurements used.
More Baking Recipes to Try
Sourdough Focaccia Bread — if croissants sparked your love of serious baking, sourdough focaccia is the natural next project. Equally rewarding, slightly more forgiving, and the smell coming from the oven is extraordinary.
Vanilla Cupcakes — when you want something reliably delicious without a two-day project. Light, fluffy, and perfect with vanilla buttercream frosting.
Homemade Cinnamon Rolls — the other great laminated pastry project for ambitious home bakers. Soft, pillowy, and loaded with cinnamon sugar filling.
Classic Sourdough Bread — the project that comes before or after croissants for most serious home bakers. Patient, rewarding, and a skill that improves every single loaf.
Honey Butter Sourdough Focaccia — sweet, salty, impossibly fluffy, and one of the most satisfying breads you can bake with a sourdough starter.