
Prep Time: 5 minutes | Cook Time: 5 minutes | Total Time: 10 minutes | Serves: 4 to 6 | Difficulty: Beginner
Hollandaise sauce has an undeserved reputation as the most terrifying thing in the home cook’s repertoire.
Mention it to most people and they immediately think: broken emulsion, scrambled eggs, wasted butter, disaster. They picture those dramatic moments from cooking shows where the sauce splits and someone gets eliminated.
Here is the truth: hollandaise sauce is not actually difficult. It is simply misunderstood — and once you understand exactly what is happening at each stage and why, it becomes one of the most satisfying and impressive things you can make in under ten minutes.
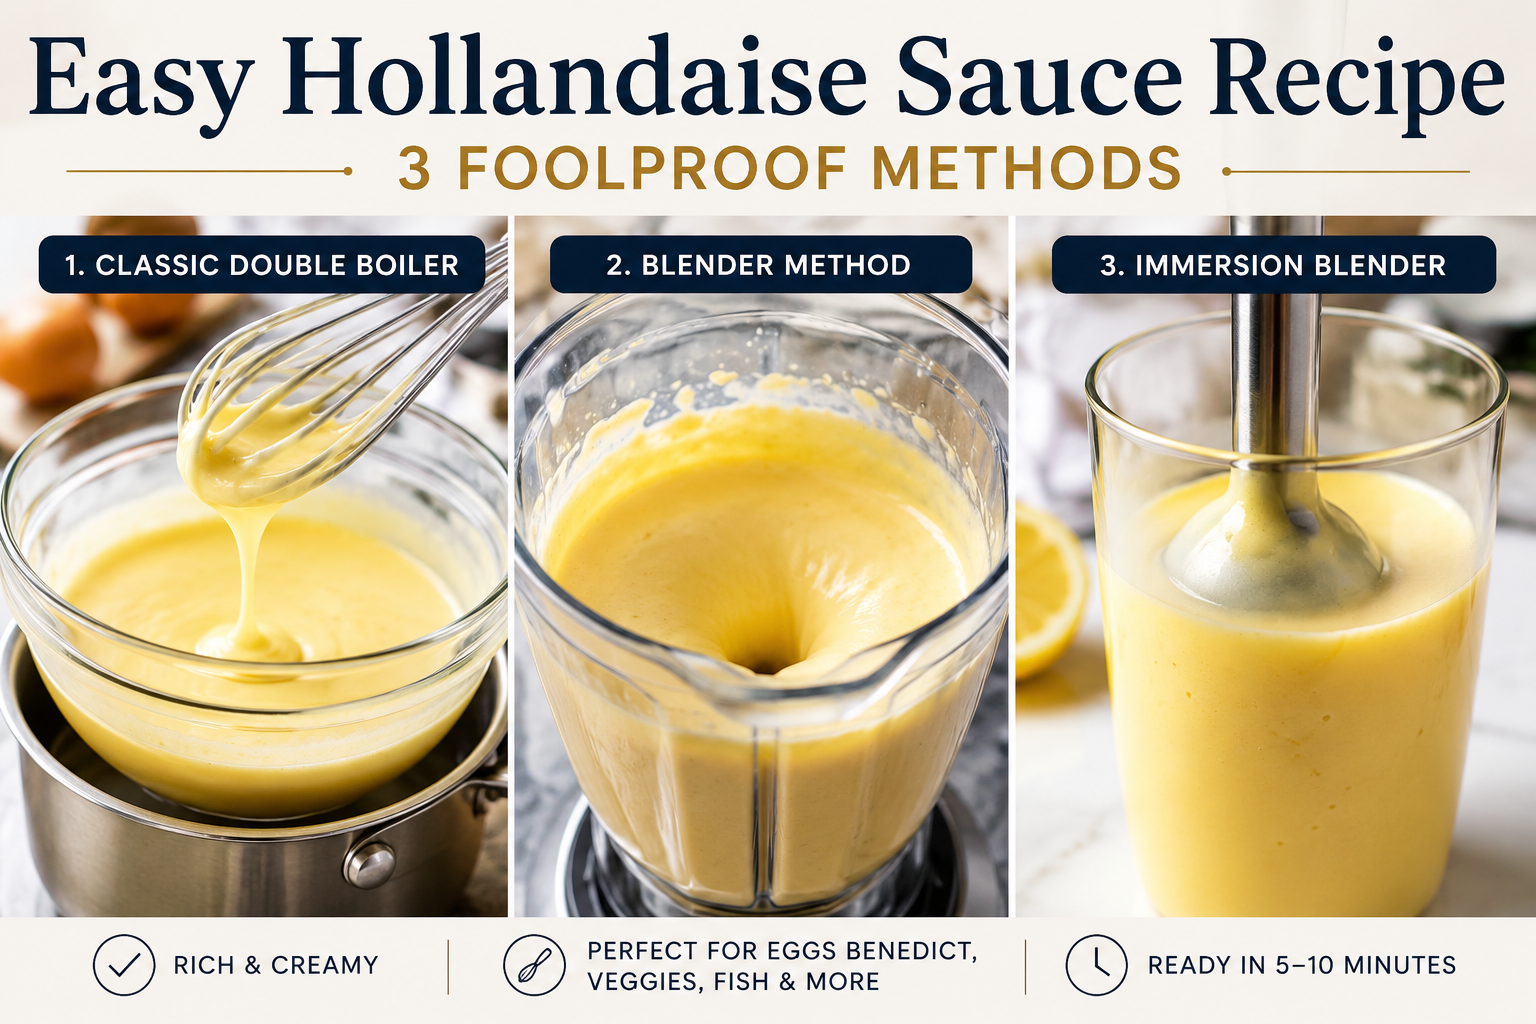
This guide gives you not one method but three: the blender method for absolute beginners and busy mornings, the immersion blender method for even faster results and easier cleanup, and the classic stovetop method for when you want to do it the traditional way and feel genuinely accomplished. All three produce the same result — a rich, velvety, buttery, lemony sauce that transforms every single thing it touches.
Once you make this, jarred hollandaise becomes something you will never consider again.
What Is Hollandaise Sauce?
Hollandaise sauce is one of the five classical French mother sauces — the foundational sauces from which hundreds of derived sauces are built. The other four are béchamel, velouté, espagnole, and sauce tomat. To be in the company of these foundational sauces tells you something about hollandaise’s status in the culinary world: it is not just a condiment, it is a cornerstone.
At its most basic, hollandaise is an emulsion — a stable mixture of two liquids that would normally refuse to combine. In this case, those liquids are egg yolks and clarified butter, brought together with the help of lemon juice and the careful application of heat.
The name is something of a historical mystery. Despite containing the word “Holland,” the sauce almost certainly originated in France — possibly as a tribute to Dutch butter, which was highly regarded in French culinary circles in the 18th century. Whatever its origin, it became one of the defining sauces of French cuisine and the irreplaceable finishing touch on Eggs Benedict.
Why This Recipe Is Better Than Most
Most hollandaise recipes teach you one method and leave you with a sauce that works in ideal conditions — but breaks at the first sign of a problem. This recipe is different in four ways:
Three methods, one result. Whether you have a blender, an immersion blender, or just a whisk and a saucepan, this guide covers every scenario and produces consistently excellent sauce from all three starting points.
Complete troubleshooting. This recipe explains not just what to do, but what is actually happening at each stage — so when something looks wrong, you understand why and know exactly how to fix it.
Variations and serving ideas that go beyond Eggs Benedict. Hollandaise is extraordinary on dozens of things that most recipes never mention. This guide covers all of them.
Make-ahead instructions that actually work. Most recipes say “serve immediately” and leave you stranded. This one tells you exactly how to hold the sauce warm for up to an hour, and how to reheat it successfully the next day.

The Science Behind Hollandaise
Understanding the science makes you a better cook — and it makes troubleshooting instinctive rather than panicked.
Hollandaise is an emulsion, meaning fat (butter) and water (lemon juice, egg yolk water content) are forced to combine into a stable, creamy mixture. Normally, fat and water repel each other. The emulsifier — in this case, the lecithin in egg yolks — acts as a bridge between the two, stabilizing the mixture and preventing it from separating.
The heat serves two purposes: it partially cooks the egg yolks, which thickens them and gives them more emulsifying power, and it keeps the butter warm enough to stay liquid and flow into the emulsion smoothly.
The two ways hollandaise breaks:
Too much heat scrambles the egg proteins, which can no longer emulsify anything — the sauce turns grainy and separates. Too little heat (or butter that is too cool) means the emulsion never forms properly and the sauce stays thin and oily.
The sweet spot is gentle, consistent heat — just enough to thicken the yolks without cooking them. Understanding this is the entire secret of hollandaise.
Ingredients
The Core Recipe (Makes approximately 1 cup — serves 4 to 6)
- 3 large egg yolks — room temperature is important; cold yolks from the refrigerator do not emulsify properly with hot butter
- ½ cup (115g / 1 stick) unsalted butter — this is the amount for a standard batch; use good quality butter — it is the primary flavor
- 1 tablespoon fresh lemon juice — freshly squeezed; bottled lemon juice is noticeably more acidic and less fresh-tasting
- 1 tablespoon warm water — helps the emulsion form and controls the consistency
- ½ teaspoon Dijon mustard — optional, but it acts as an additional emulsifier and adds a gentle savory depth
- Pinch of cayenne pepper — the classic finishing touch; it adds warmth without heat
- Salt to taste — fine sea salt preferred
Ingredient Notes
On the butter: Unsalted butter gives you complete control over the final seasoning. If you use salted butter, taste before adding any additional salt. The butter must be very hot when added — not just melted, but actively hot. Warm butter that has been sitting will not emulsify properly.
On the egg yolks: Use large eggs — the yolk size matters for the ratio. Very small eggs may not provide enough emulsifying power to hold the full amount of butter. Room temperature yolks emulsify faster and more reliably than cold ones. Set your eggs out 30 minutes before making the sauce.
On the lemon: Fresh is non-negotiable for best flavor. Roll the lemon firmly on the counter before cutting — this breaks down the juice cells and produces significantly more juice. Strain out any seeds before measuring.
On clarified butter vs regular butter: Classical hollandaise uses clarified butter — butter with the milk solids and water removed — because it is more stable and has a more concentrated butter flavor. For a home recipe, regular unsalted butter works perfectly well and produces a slightly richer, more rounded result. If you want to make clarified butter, simply melt the butter slowly, skim the foam off the top, and pour off the clear golden liquid, leaving the white milk solids behind in the pan.
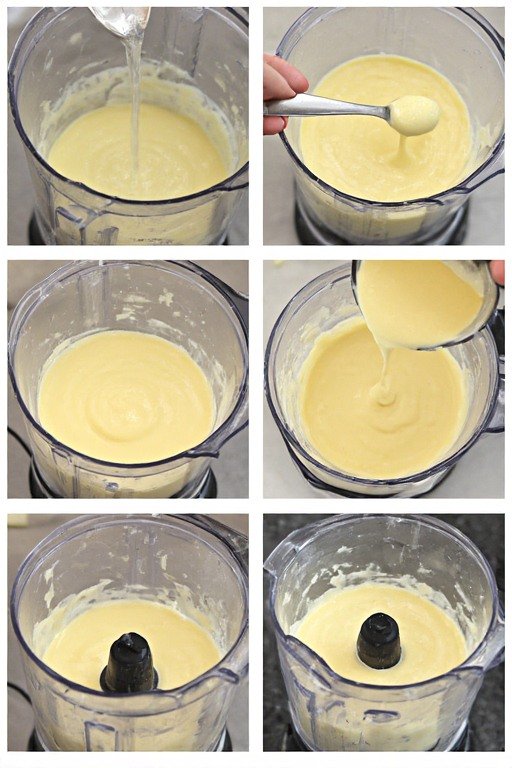
Method 1 — The Blender Method (Easiest, Best for Beginners)
Time: 5 minutes | Equipment: Blender
This is the method recommended by most professional cooks for home kitchens — and even Julia Child advocated for the blender approach. It is genuinely foolproof, produces a perfectly smooth result every time, and takes about five minutes from start to finish.
Step 1 — Prepare the Blender
Add the egg yolks, warm water, fresh lemon juice, Dijon mustard (if using), and a pinch of salt to the blender. Blend on medium-low for 20 to 30 seconds until the mixture is smooth, slightly frothy, and pale yellow in color. The blending step aerates the yolks and begins building the emulsion before any butter is added.
Step 2 — Melt and Heat the Butter
Melt the butter in a small saucepan over medium heat, or in the microwave in 30-second intervals. The butter must be very hot — not just melted, but actively bubbling and hot to the touch. This is the most important step in the blender method: the heat from the butter partially cooks the egg yolks as it is streamed in, which is what gives the sauce its characteristic thick, velvety texture.
If the butter is not hot enough, the yolks will not cook and the sauce will be thin and oily rather than thick and creamy.
Step 3 — Stream the Butter In
With the blender running on its lowest setting, remove the small center cap from the blender lid — this creates a small opening for pouring. Begin pouring the hot melted butter in a very slow, thin, steady stream directly into the running blender.
The key word is slow. Do not pour in large amounts at once — the emulsion needs time to incorporate each addition of butter before receiving more. Pour continuously but very slowly for the first third of the butter, then you can increase the flow slightly as the emulsion becomes more stable.
The thin stream is everything: Adding butter too quickly overwhelms the emulsifying capacity of the egg yolks before the emulsion has a chance to stabilize. A thin, steady stream gives the lecithin in the yolks time to coat each droplet of butter and hold the mixture together. Pour slowly for the first 30 seconds — after that, the emulsion is established and can accept the butter more quickly.
Step 4 — Taste and Adjust
Once all the butter has been added, the sauce should be thick, glossy, and smooth — it should coat the back of a spoon. Add cayenne pepper and taste for salt and lemon. If it needs more brightness, add another few drops of lemon juice. If it is too thick, add a teaspoon of warm water and blend briefly.
Serve immediately or keep warm (see storage section below).
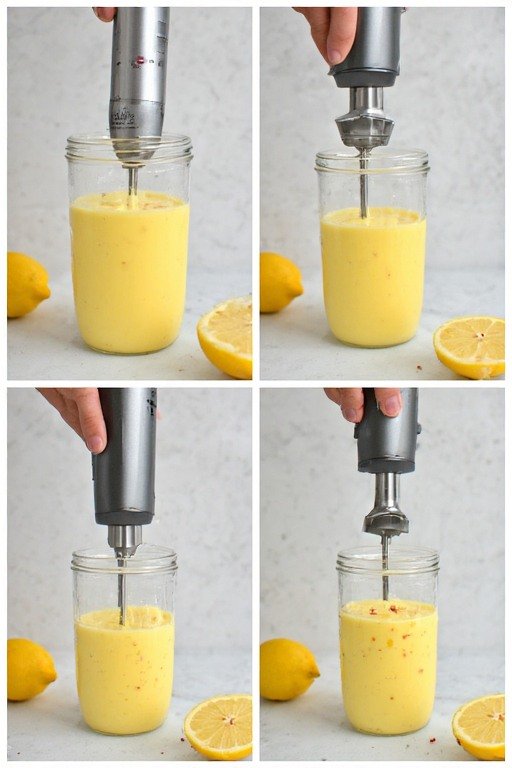
Method 2 — The Immersion Blender Method (Fastest, Easiest Cleanup)
Time: 3 minutes | Equipment: Immersion blender, tall narrow container
This method is even faster than the blender method and produces less washing up — the immersion blender goes directly into the container you serve from.
Step 1 — Combine the Yolks
Place the egg yolks, lemon juice, warm water, Dijon, and salt in a tall, narrow container — a wide-mouth mason jar or a measuring jug work perfectly. The container needs to be narrow enough that the immersion blender head can reach the yolks at the bottom.
Step 2 — Heat the Butter
Melt the butter and heat it until it is very hot and actively bubbling. This is even more important in the immersion blender method because the butter heat must do all the work of cooking the yolks — there is no separate gentle heat source.
Step 3 — Blend and Pour Simultaneously
Place the immersion blender into the container with the yolk mixture and turn it on. With the blender running at the bottom of the container, begin pouring the hot butter in a slow, steady stream from above. Keep the blender running and at the base of the container for the first 30 seconds — do not move it until the emulsion has clearly formed and the bottom of the container looks thick and pale yellow.
Once you can see the thick sauce forming at the bottom, slowly move the blender up through the sauce as you continue pouring the remaining butter.
Step 4 — Finish and Serve
By the time all the butter has been added, the sauce should be thick, smooth, and glossy. Season with cayenne, taste for salt and lemon, and serve directly from the container.
The narrow container rule: The immersion blender method only works in a container narrow enough to keep the egg yolks in contact with the blender head. In a wide bowl, the yolks spread out and the blender cannot emulsify them efficiently. A tall, narrow container — narrower than a pint glass — is essential.
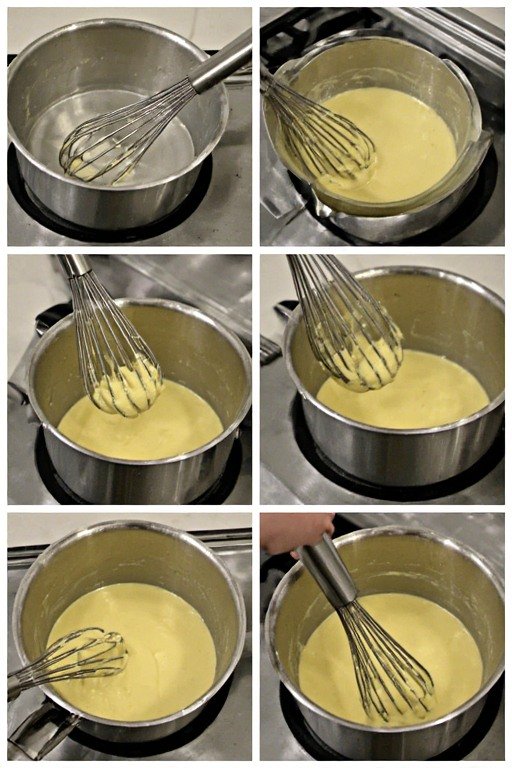
Method 3 — The Classic Stovetop Method (Traditional, Most Satisfying)
Time: 10 minutes | Equipment: Small saucepan or double boiler, whisk
This is the original method — the one used in professional kitchens for centuries. It requires more attention and technique than the blender methods but produces a sauce with a slightly lighter, more aerated texture and a depth of flavor that comes from the gradual cooking of the yolks over gentle heat.
Step 1 — Set Up Your Double Boiler
Fill a medium saucepan with about 2 inches of water and bring it to a gentle simmer — not a rolling boil. Place a heatproof bowl (glass or stainless steel) over the saucepan, ensuring the bottom of the bowl does not touch the water. The bowl should sit above the steam, not in contact with the water. This indirect heat is what makes stovetop hollandaise forgiving — it is nearly impossible to overheat the eggs in a proper double boiler setup.
Step 2 — Whisk the Yolks
Add the egg yolks, warm water, and lemon juice to the bowl. Whisk vigorously and constantly over the gently simmering water. You are looking for the mixture to become pale, slightly frothy, and thickened — it should roughly double in volume and leave a ribbon trail when you lift the whisk. This takes approximately 3 to 5 minutes of consistent whisking.
This stage is called the sabayon — and getting it right is the foundation of the sauce. The yolks are partially cooked and their emulsifying power is fully activated.
How to know the sabayon is ready: Lift the whisk and let the mixture fall back into the bowl. It should fall in a thick ribbon that holds its shape on the surface for 2 to 3 seconds before dissolving back in. If it falls in a thin stream immediately, continue whisking. If it has visible lumps or looks grainy, the heat is too high — move the bowl off the steam immediately and whisk vigorously.
Step 3 — Add the Butter
Remove the bowl from the heat — the residual warmth in the bowl is enough for the next stage. Begin adding the melted butter, a tablespoon at a time, whisking vigorously between each addition until fully incorporated before adding more.
As the sauce comes together and becomes more stable, you can add the butter in a thin, steady stream while whisking continuously. The sauce should thicken noticeably with each addition. If at any point it looks like it might be getting too warm or the emulsion looks unstable, remove from the double boiler and whisk off the heat for 30 seconds before returning.
Step 4 — Season and Serve
Once all the butter is incorporated and the sauce is thick, velvety, and coats the back of a spoon, season with cayenne, salt, and taste for lemon balance. Serve immediately.
The bowl-touching-water mistake: If the bottom of your double boiler bowl touches the simmering water, the heat is too direct and too intense — the eggs will scramble. The bowl should sit above the water with a gap of at least 1 to 2 inches. The steam, not the water, does the work.
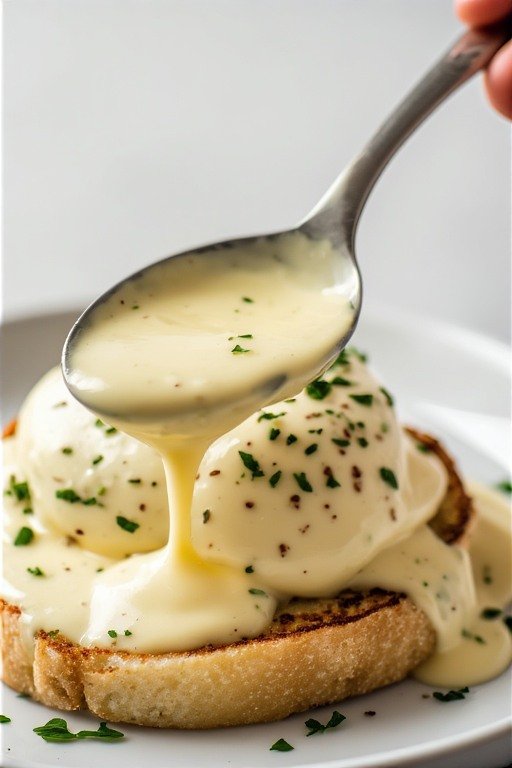
How to Know Your Hollandaise Is Perfect
A perfectly made hollandaise sauce has very specific characteristics. Here is what you are looking for:
Color: Pale, creamy yellow — not dark golden, not stark white. The pale yellow comes from the egg yolks cooked gently to just the right temperature.
Consistency: It should coat the back of a spoon and hold a line when you draw your finger through it. It should pour in a thick ribbon, not run off like water or hold stiffly like mayonnaise.
Texture: Completely smooth and velvety — no lumps, no graininess, no visible separation of fat and liquid. If you see droplets of liquid butter sitting separately from the sauce, the emulsion is beginning to break.
Flavor: Rich and buttery with a bright lemon lift and a warmth from the cayenne in the finish. It should not taste like scrambled eggs, should not be overwhelmingly sour, and should not taste flat or only of butter.
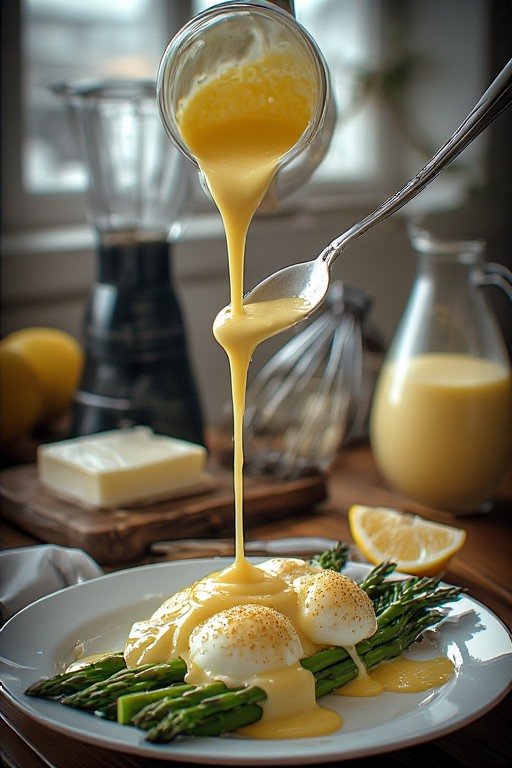
What to Serve with Hollandaise Sauce
Hollandaise sauce is far more versatile than most people realize. It goes far beyond Eggs Benedict — here is the complete guide to every dish that benefits from hollandaise.
Classic Pairings
Eggs Benedict: The original and definitive pairing. A toasted English muffin topped with Canadian bacon or ham, a perfectly poached egg, and a generous ladle of hollandaise. This is the standard by which all hollandaise is judged.
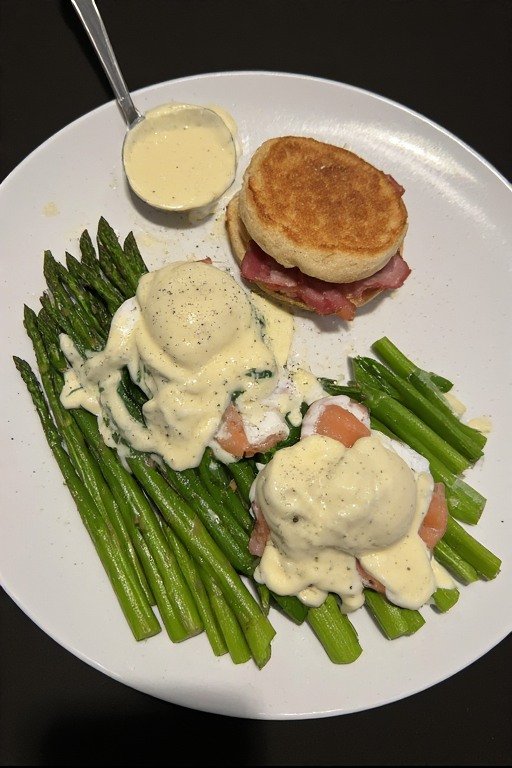
Eggs Royale: Exactly like Eggs Benedict but with smoked salmon instead of Canadian bacon. Arguably more elegant and at least as delicious.
Eggs Florentine: Eggs Benedict with sautéed spinach replacing the meat — a beautiful vegetarian version.
Steamed Asparagus: This is the second most classic hollandaise pairing after Eggs Benedict. The buttery richness of hollandaise and the fresh, green crunch of asparagus is one of the great vegetable-sauce combinations in all of cooking. Always serve the hollandaise alongside for dipping rather than pouring over — it keeps the asparagus from going limp.
Vegetable Pairings
Roasted Broccoli: A generous drizzle of hollandaise over roasted broccoli florets transforms a simple side dish into something remarkable. The charred edges of the broccoli against the creamy, buttery sauce is unexpectedly brilliant.
Steamed Green Beans: Light, simple, and elevated. Particularly good with the lemon caper variation.
Roasted Cauliflower: The nutty sweetness of roasted cauliflower and the richness of hollandaise are exceptional together. Use the roasted garlic variation for maximum impact.
Baked Potatoes: Hollandaise spooned over a split baked potato with a pinch of chives is a simple, indulgent side that feels like restaurant food.
Corn on the Cob: Replace compound butter with hollandaise for a genuinely luxurious summer side. Use the chipotle variation for a smoky, spicy version.

Brunch and Breakfast Pairings Beyond Eggs Benedict
Avocado Toast: Replace the usual lime squeeze and chili flakes with a drizzle of hollandaise. Add a poached egg on top and you have the most elevated avocado toast in existence.
Waffles and Fried Chicken: Unconventional but genuinely outstanding — a small amount of hollandaise alongside sweet maple syrup on a savory waffle-and-chicken plate is a sweet-salty-rich combination that works beautifully.
Hash Browns: A pour of hollandaise over crispy hash browns and a soft fried egg is a simple, casual breakfast that feels considerably more luxurious than the sum of its parts.
Smoked Salmon Bagels: Hollandaise as a warm sauce alternative to cream cheese on a smoked salmon bagel is unexpectedly brilliant — particularly the lemon caper variation.
How to Keep Hollandaise Warm for Serving
Hollandaise should be served warm — not hot, not cold. Here are four methods for keeping it at the perfect serving temperature.
Method 1 — The Thermos Method (Best for Parties) Pre-warm a wide-mouth thermos by filling it with boiling water, letting it sit for 5 minutes, then pouring the water out. Fill immediately with freshly made hollandaise. The sauce will stay at serving temperature for up to 2 hours. This is the professional catering method and it works extraordinarily well.
Method 2 — The Hot Water Bath Place the hollandaise in a heatproof bowl or pitcher. Nest this inside a larger bowl filled with very hot — not boiling — water. The sauce will stay warm for 30 to 45 minutes. Change the hot water after 20 minutes to maintain the temperature.
Method 3 — The Double Boiler on Lowest Setting Keep the hollandaise in the double boiler bowl over the lowest possible heat setting — barely a simmer. Stir occasionally. Do not let the water beneath get hot enough to steam vigorously — the sauce should be kept just warm, not heated further.
Method 4 — Room Temperature (Short Holds) If you are serving within 15 to 20 minutes, simply cover the bowl tightly with plastic wrap and leave at room temperature. The sauce will hold its consistency and remain at a pleasant serving temperature for about 20 minutes without any intervention.
Frequently Asked Questions
Why did my hollandaise sauce break? Hollandaise breaks for two main reasons: the butter was added too quickly, overwhelming the emulsifying capacity of the yolks, or the heat was too high, partially scrambling the eggs. Fix a broken sauce by starting with a fresh egg yolk and a teaspoon of warm water in a clean bowl, then slowly whisking the broken sauce into the new yolk — it re-emulsifies in almost every case.
Can I make hollandaise sauce without a blender? Absolutely — the classic stovetop double boiler method requires only a whisk and a heatproof bowl. Many cooks prefer it because the gentle heat control produces an exceptionally silky result. The blender methods are faster and more beginner-friendly, but the stovetop method is not difficult once you understand the technique.
Is it safe to eat hollandaise sauce? Hollandaise contains partially cooked egg yolks — they are heated to approximately 63°C to 70°C (145°F to 160°F) during preparation, which is sufficient to eliminate Salmonella in most cases. If you are serving anyone who is pregnant, immunocompromised, very young, or elderly, use pasteurized eggs as a precaution. Pasteurized eggs are available at most grocery stores and behave identically to regular eggs in this recipe.
What is the difference between hollandaise and béarnaise sauce? Both are butter and egg yolk emulsions from the same French sauce family. The primary difference is the acid component and the aromatics: hollandaise uses lemon juice for its acid, while béarnaise uses a reduction of white wine vinegar with shallots and is finished with fresh tarragon. Béarnaise has a more savory, herb-forward flavor specifically calibrated for beef and grilled meats. Hollandaise has a brighter, more delicate lemon character that works across a wider range of dishes.
Why does my hollandaise taste eggy? An eggy flavor usually means the yolks were overcooked — heated too long or at too high a temperature, which develops a cooked-egg flavor rather than the rich, buttery taste hollandaise should have. Lower the heat and cook the yolks more gently. In the blender method, ensure your butter is very hot — the brief exposure to intense heat from the butter cooks the yolks rapidly without developing that eggy flavor.
Can I use salted butter? Yes, but reduce or eliminate any additional salt and taste carefully before seasoning. Salted butter works perfectly well in hollandaise — you simply need to account for the existing salt content.
How much hollandaise should I make per person? For Eggs Benedict, plan for approximately 3 to 4 tablespoons (45 to 60ml) per serving. For vegetables or other applications where it is a drizzle rather than a generous pour, 2 tablespoons per person is usually sufficient. This recipe makes approximately 1 cup, enough for 4 servings of Eggs Benedict.
Why is my hollandaise sauce green? Green hollandaise is almost always caused by a chemical reaction between the lemon juice and a reactive metal bowl — typically copper or cast iron. Always use a glass, stainless steel, or ceramic bowl for making hollandaise. The reaction is harmless but produces an unpleasant color. Switch to a non-reactive bowl and the sauce will be the correct pale yellow color.
Can I make a dairy-free hollandaise? Yes — use a high-quality vegan butter in place of regular butter. The best results come from vegan butters that have a similar fat content to regular butter — brands with a high percentage of coconut oil or a blend of plant-based fats work best. The emulsification process is identical. The flavor will be slightly different but still excellent.
Nutritional Information (Per Serving — Approximately ¼ cup)
| Nutrient | Amount |
|---|---|
| Calories | 220 kcal |
| Total Fat | 24g |
| Saturated Fat | 14g |
| Cholesterol | 195mg |
| Sodium | 180mg |
| Carbohydrates | 1g |
| Sugar | 0g |
| Protein | 2g |
| Vitamin A | 18% DV |
| Calcium | 3% DV |
| Iron | 3% DV |
Values are approximate and will vary based on specific butter brand and exact quantities used.