
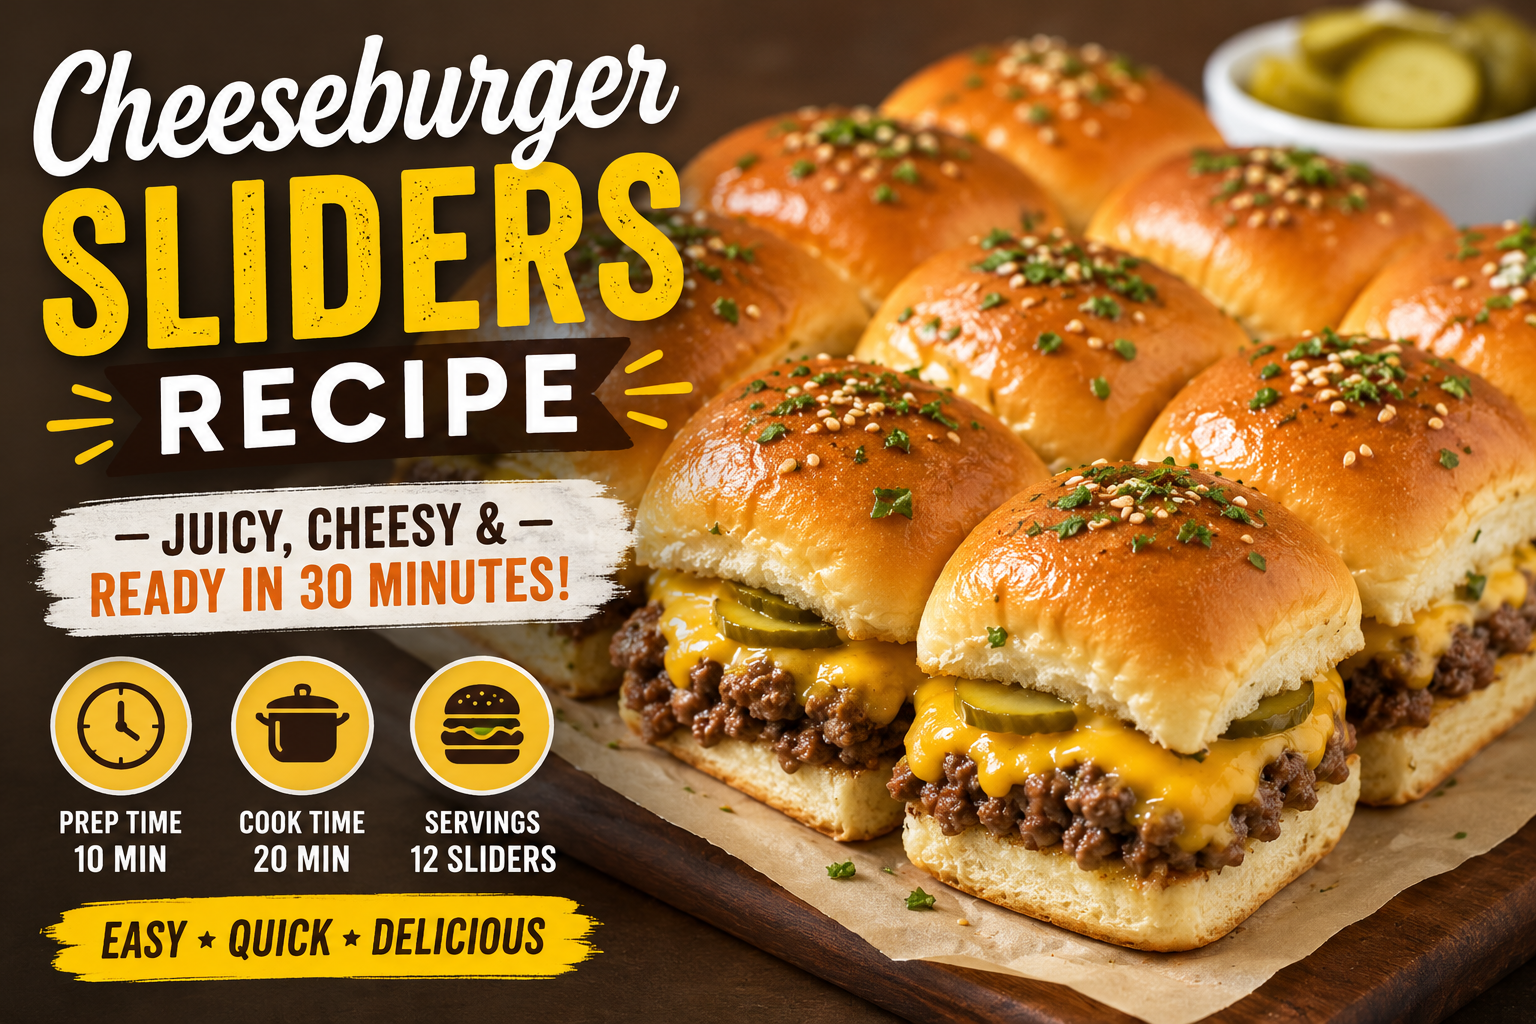
Prep Time: 8 minutes | Cook Time: 22 minutes | Total Time: 30 minutes | Makes: 24 sliders | Serves: 8 to 12 | Difficulty: Beginner
Some recipes earn a permanent spot in your rotation the very first time you make them. These cheeseburger sliders are one of those recipes.
Juicy seasoned ground beef. Two layers of melted cheddar — one under the beef, one on top — that seals in every bit of moisture. A butter and sesame seed glaze on top of soft, slightly sweet Hawaiian rolls that comes out of the oven golden and completely irresistible. And the whole thing takes 30 minutes, feeds a crowd, and can be made entirely ahead of time.
No standing over a grill. No forming individual patties. No last-minute stress. Just one pan, one skillet, and dinner completely handled.
Why These Cheeseburger Sliders Work So Well
Most slider recipes produce one of two problems: soggy buns or dry beef. This recipe solves both with two specific techniques.
The double cheese layer prevents soggy buns. A layer of sliced cheddar goes directly on the bottom rolls before any beef touches them — it acts as a moisture barrier, keeping the bun soft without becoming wet. A second layer of shredded cheddar goes on top of the beef and melts down through the filling, binding everything together.
Mayo stirred into the beef keeps it juicy. Lean ground beef is the right choice for sliders because it produces less grease — but less fat also means it can dry out. Stirring mayonnaise into the cooked beef before assembling adds back the moisture and richness that makes every bite genuinely juicy rather than dense and dry.
Both of these are small details that make the difference between a good slider and a great one.
The Best Rolls for Cheeseburger Sliders
King’s Hawaiian rolls are the gold standard for slider recipes — their slightly sweet, pillowy soft texture is the perfect contrast to the savory seasoned beef and cheddar. The Original Hawaiian Sweet flavor is the most widely used, but the Savory Butter variety is equally excellent and arguably even better with the beef filling.
Buy a 24-pack of dinner rolls, or two 12-packs — they come connected in a sheet, which makes assembly dramatically faster. You slice the entire sheet of rolls horizontally in one cut, layer everything in, and bake as a single unit. Individual sliders are cut only at the very end, right before serving.
If King’s Hawaiian is unavailable, any soft, slightly sweet dinner roll works well. Plain white dinner rolls are a good neutral alternative if you prefer less sweetness.
Ingredients
For the Sliders
- 2 lbs lean ground beef — 90/10 or 93/7 fat content; lean beef means less grease to drain and no soggy buns
- ½ tablespoon olive oil
- 1 teaspoon salt
- 1 teaspoon black pepper
- 1 teaspoon garlic powder
- ½ large yellow onion, finely diced
- ¼ cup mayonnaise — stirred into the cooked beef; the juiciness secret
- 8 slices medium cheddar cheese — for the bottom layer under the beef
- 6 oz (170g) medium cheddar, shredded — for the top layer over the beef
- 24 Hawaiian dinner rolls — one 24-pack or two 12-packs
- 2 tablespoons unsalted butter, melted — for the top of the rolls
- 1 tablespoon sesame seeds
For the Burger Sauce (Optional but Highly Recommended)
- ¼ cup mayonnaise
- 2 tablespoons ketchup
- 1 tablespoon sweet pickle relish
- 1 teaspoon yellow mustard
- Salt and pepper to taste
Ingredient Notes
On the ground beef: Lean 90/10 or 93/7 is the right choice for oven-baked sliders. Higher fat beef releases too much grease during cooking that soaks into the buns no matter how carefully you drain it. Lean beef keeps everything tidy — and the mayonnaise brings the juiciness back.
On the cheese: Use both sliced and shredded cheddar — they do different jobs. The sliced cheese creates a solid barrier layer on the bottom bun. The shredded cheese melts evenly over the beef surface and drapes down into the filling. Medium cheddar hits the right balance of flavor and meltability. Sharp cheddar produces a bolder, more pronounced cheese flavor if you prefer that.
On the rolls: Do not separate the rolls before slicing. Keep the entire sheet intact and slice horizontally with a serrated knife — the connected rolls hold the entire assembly together during baking and make it infinitely easier to serve.
Step-by-Step Instructions
Step 1 — Preheat and Prep
Preheat your oven to 175°C (350°F). Lightly butter the bottom of a large rimmed baking sheet — this prevents the bottom rolls from sticking and adds a little extra richness to the base.
Mix the burger sauce ingredients together in a small bowl if making it. Set aside.
Step 2 — Cook the Beef
Heat a large skillet over medium-high heat with the olive oil. Add the finely diced onion and cook for 2 minutes until softened. Add the ground beef, breaking it up constantly with a spatula or wooden spoon into small, uniform pieces.
Season with salt, black pepper, and garlic powder. Cook until completely browned through with no pink remaining — about 8 minutes.
Tilt the skillet and use a spoon to remove and discard as much of the rendered fat and liquid as possible. This step is non-negotiable for avoiding soggy buns — take your time and remove everything you can.
Remove from heat and stir in the ¼ cup of mayonnaise until evenly distributed through the beef.
The mayo technique: Stir the mayo into the hot, just-cooked beef while it is still in the skillet off the heat. The warmth of the beef helps the mayo coat every piece evenly. The result is noticeably juicier beef than any slider you have made without it.
Step 3 — Assemble the Sliders
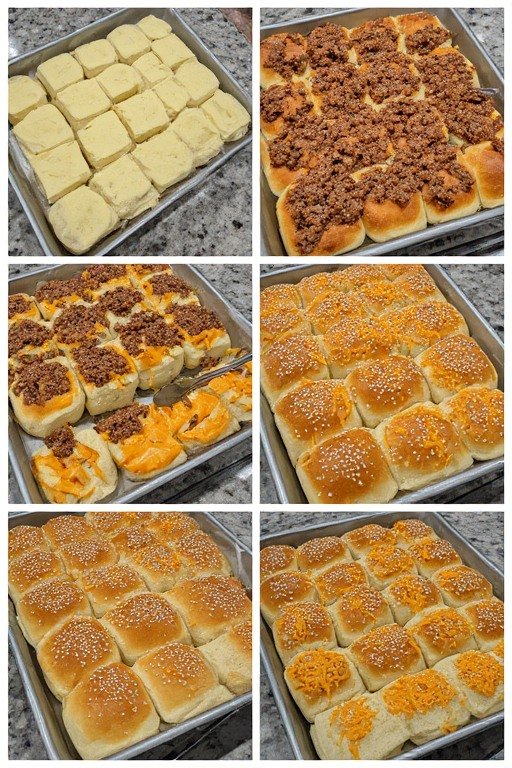
Without separating the rolls, use a long serrated knife to slice the entire sheet of rolls horizontally in half — creating one large connected bottom half and one large connected top half.
Place the bottom half of the rolls cut-side up on the prepared baking sheet.
Layer the sliced cheddar cheese over the entire surface of the bottom rolls, covering edge to edge. This cheese layer is your moisture barrier — make sure there are no gaps.
Spoon the ground beef mixture evenly over the cheese layer. Use the back of a spatula to spread it all the way to the edges and press it into an even, flat layer. Squaring off the edges neatly means every slider in the tray gets the same amount of filling.
Spread the shredded cheddar evenly over the entire beef surface.
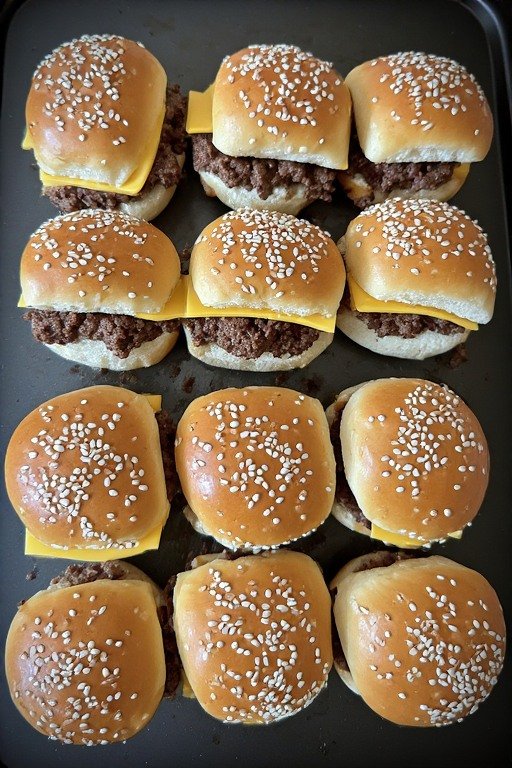
Place the top half of the rolls cut-side down over everything.
Step 4 — Butter and Bake
Brush the melted butter evenly over the entire top surface of the rolls. Immediately sprinkle the sesame seeds over the buttered surface — they adhere much better to wet butter than dry.
Bake uncovered: Do not cover the sliders with foil. Covered sliders trap steam, which makes the tops of the rolls soft and slightly damp rather than golden and lightly toasted. Bake uncovered for the entire time — the tops should come out gently golden and the sesame seeds should be lightly set.
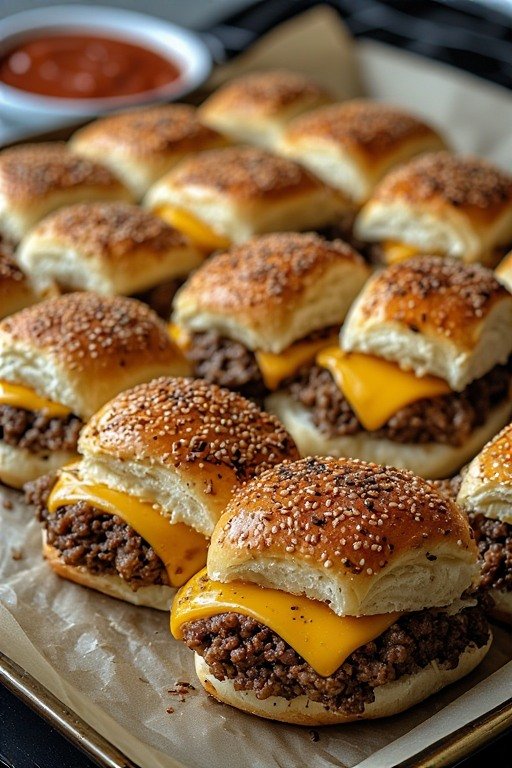
Bake at 175°C (350°F) for 12 to 15 minutes until the cheese is fully melted and the tops of the rolls are golden brown.
Step 5 — Cut and Serve
Remove from the oven and let the pan rest for 2 minutes — this allows the cheese and filling to set slightly, making cutting cleaner.
Using a sharp knife, cut between the rolls to separate individual sliders. The connected baking method means every slider has clean, defined edges and the filling stays neatly inside each one.
Serve immediately with dill pickles, burger sauce for dipping, and your chosen sides.
6 Tips for Perfect Cheeseburger Sliders Every Time
Drain the fat thoroughly. This is the single most important step for avoiding soggy buns. After cooking the beef, tilt the skillet and remove every visible pool of fat with a large spoon. Even a small amount of excess grease left in the beef will migrate into the buns during baking.
Line the bottom rolls with cheese before adding beef. The sliced cheese creates a physical barrier between the beef and the bread. Without it, beef juices soak directly into the bun from below. With it, the bottom roll stays perfectly soft without becoming wet.
Use a serrated knife to slice the rolls. A regular knife compresses the soft rolls and tears them rather than cutting cleanly. A serrated knife saws through the rolls without compression, giving you a clean, even cut across the entire sheet.
Apply sesame seeds immediately after brushing with butter. Butter cools and sets quickly. Sesame seeds sprinkled on warm, wet butter stick instantly and stay through baking. Seeds added to cool butter slide off in the oven.
Do not overcrowd the beef layer. Spread the beef to an even, flat layer across the rolls. A thick, uneven beef layer means some bites have too much and some have too little — and the thick spots take longer to heat through, which means the buns may over-bake by the time the center is hot.
Square off the edges. Use the back of a spatula to push the beef mixture all the way to the edges of the rolls and press it flat. This ensures every single slider in the outer row gets the same amount of filling as the center ones.
Can I Make These Ahead?
Yes — and this is one of the best things about this recipe. Cheeseburger sliders are genuinely ideal for advance preparation.
Up to 1 day ahead: Fully assemble the sliders — cooked beef, both cheese layers, top buns in place, butter and sesame seeds on top — cover tightly with plastic wrap, and refrigerate. When ready to bake, remove from the refrigerator 15 minutes before baking. Add 3 to 5 extra minutes to the baking time to account for the cold filling.
The beef filling only: Cook the ground beef with onions, drain, stir in mayo, and refrigerate for up to 2 days. Assemble and bake when ready — takes under 5 minutes to put together.
Reheating baked sliders: Individual sliders reheat well in the microwave uncovered for 15 to 20 seconds — just until the beef is warm and the cheese is re-melted. For a full tray, reheat in a 175°C (350°F) oven for 8 to 10 minutes until heated through.
What to Serve with Cheeseburger Sliders
| Side Dish | Why It Works |
|---|---|
| Chilled dill pickles | Classic pairing — the brine cuts through the richness |
| Baked potato wedges | The French fry experience without the fryer |
| Creamy coleslaw | Cool, tangy contrast to the warm, savory sliders |
| Macaroni and cheese | The ultimate comfort food combination |
| Garden salad | Keeps things light alongside the rich sliders |
| Onion rings | Classic burger pairing, works perfectly with sliders |
Frequently Asked Questions
Can I use 80/20 ground beef instead of lean? Yes, but drain very thoroughly. Higher fat beef releases significantly more grease, which can soak through even the cheese barrier and make the bottom buns greasy. If using 80/20, drain twice — once immediately after cooking and once more after the beef has rested for 2 minutes.
Why do my slider buns come out soggy? Three possible causes: the fat was not drained thoroughly enough from the beef, the sliders were baked covered (trapping steam), or the cheese barrier layer was incomplete. Address all three and the buns will be perfectly soft without any sogginess.
Can I make these without Hawaiian rolls? Yes — any soft dinner roll works well. Plain white dinner rolls produce a more savory, less sweet result. Brioche rolls are a rich, buttery alternative that pairs beautifully with the beef and cheese. The slightly sweet character of Hawaiian rolls is what makes them the most popular choice.
How many sliders per person? As a main course: 3 to 4 per adult, 2 to 3 per child. As an appetizer alongside other food: 2 per person. This recipe makes 24 sliders — enough for 6 to 8 people as a main course.
Can I halve the recipe? Yes — halve all ingredient quantities and use one 12-pack of Hawaiian rolls in an 8×8 or 9×13 inch baking dish. Keep the baking time exactly the same.
Nutritional Information (Per Slider, Approximate)
| Nutrient | Amount |
|---|---|
| Calories | 266 kcal |
| Protein | 16g |
| Carbohydrates | 21g |
| Fat | 13g |
| Saturated Fat | 5g |
| Sodium | 420mg |
| Fiber | 1g |
Values are approximate based on 24 sliders. Burger sauce and optional toppings not included.