

Published: May 2025 | Perfect For: High School Graduation, College Graduation, Kindergarten Graduation, Any Grad Party
Graduation season brings one question to every party planner’s mind: what dessert is going to make people stop, pick up their phone, and take a photo before they even take a bite?
Graduation cookies are the answer — every single time.
A beautifully decorated cookie sitting on a dessert table does something a store-bought sheet cake simply cannot. It feels personal. It feels intentional. It tells the graduate that someone spent real time and thought making something specifically for this moment.
The best part is that graduation cookie ideas range from incredibly simple — beginner-friendly designs anyone can pull off on a Saturday afternoon — to genuinely stunning showpieces that look like they came from a professional bakery. This list covers all of it: 18 of the best graduation party cookie ideas organized by design, skill level, and occasion, with everything you need to know to make each one.
Whether you are decorating your own or ordering from a bakery, this guide gives you the complete picture.
Before You Start — The Basics of Graduation Cookie Decorating
The Best Cookie Base for Decorated Cookies
Decorated graduation cookies are almost always built on a sugar cookie base — and for good reason. Sugar cookies hold their shape during baking, have a mild flavor that does not compete with decorative icing, and provide a smooth, firm surface for royal icing to set on.
A few things to keep in mind for the perfect base:
Chill the dough before cutting. Chilled dough holds its shape in the oven far better than room-temperature dough. After rolling and cutting, place the cut shapes on the baking sheet and refrigerate for 15 minutes before baking. The edges stay sharp and clean.
Bake until just set, not golden. Decorated sugar cookies should be baked until the surface looks dry and set but before any color appears at the edges. Golden-edged cookies are slightly overbaked — the residual heat from the pan finishes them. Pull them early.
Cool completely before decorating. This sounds obvious but cannot be overstated. Any warmth remaining in the cookie will melt your royal icing before it sets, causing it to slide, pool at the edges, and crack as it dries. Fully cool — at least 1 hour at room temperature.
Royal Icing vs Fondant vs Buttercream
Royal icing is the gold standard for decorated cookies. It dries to a firm, smooth finish, holds detail beautifully, and produces that professional-looking surface you see on bakery cookies. It is made from powdered sugar, meringue powder, and water — adjusting the water content gives you flooding consistency (thin, for filling in large areas) and piping consistency (thicker, for outlines and details).
Fondant rolled thin and cut to the cookie shape produces an exceptionally smooth, professional finish. It is easier for beginners than royal icing because it does not require the flooding technique. The trade-off is that fondant has a more distinctive flavor and slightly different texture under the tooth.
Buttercream is the most forgiving and the easiest to work with — but it does not dry firm, which means buttercream-decorated cookies smear easily and cannot be stacked. Best for casual gatherings where presentation is important but transport is minimal.
Must-Have Graduation Cookie Cutters
Before you choose your design, make sure you have the right cutters:
- Graduation cap (mortarboard) — the single most essential graduation cookie shape
- Diploma scroll — perfect for elegant, classic designs
- Graduation gown — dramatic shape, very recognizable
- Star — versatile and easy to decorate in school colors
- Number cutters (2, 0, 2, 6) — for “Class of 2026” cookies
- Rectangle/photo plaque — great for custom name cookies
- Tassel shape — surprisingly elegant as a standalone cookie
The 18 Best Graduation Party Cookie Ideas
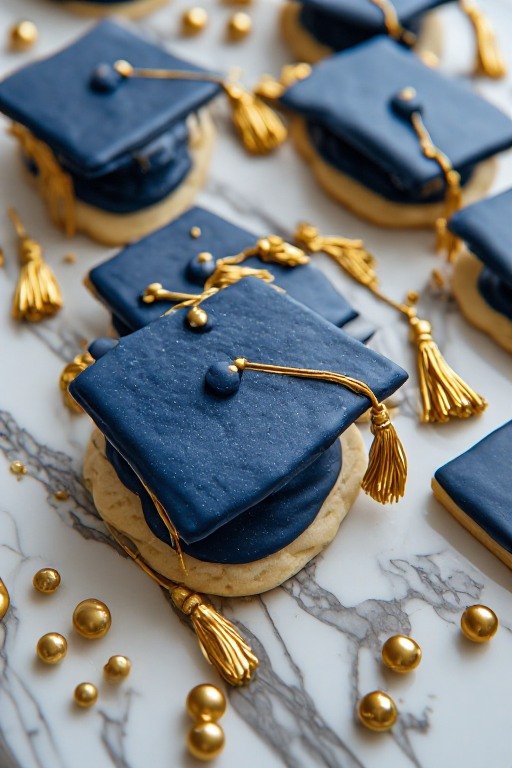
1. Classic Royal Iced Graduation Cap Cookies
Skill Level: Beginner to Intermediate | Wow Factor: ⭐⭐⭐⭐
The graduation cap is the single most iconic symbol of academic achievement — and as a decorated cookie, it is absolutely timeless. Cut the cookie dough into a square or diamond shape for the cap top, attach a small rectangle for the brim, and use a thin strip of fondant or piped royal icing for the tassel string.
Decoration approach: Flood the cap top in the school’s primary color. Let dry completely — at least 4 hours, ideally overnight. Add the tassel in the contrasting school color using a piping bag with a fine tip, letting the strings fall naturally off one side of the cap. A small gold or silver edible pearl at the tassel attachment point adds a beautiful finishing detail.
Color ideas: Navy cap with gold tassel. Black cap with red tassel. Deep purple with silver. Match the school colors exactly for maximum personalization.
Pro tip: The cap brim is the hardest part to get proportionally right. The brim should be no more than one-third the height of the cap top — wider brims look cartoonish while narrower ones look elegant. Cut a template from parchment paper before cutting the dough.
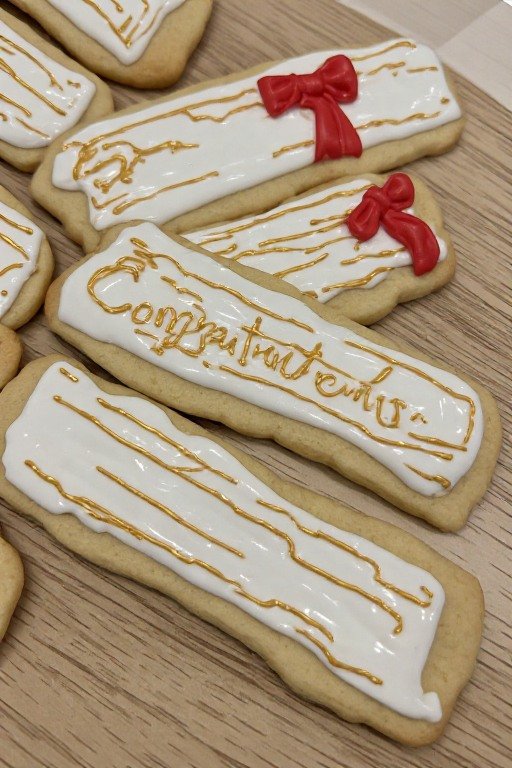
2. Diploma Scroll Cookies
Skill Level: Beginner | Wow Factor: ⭐⭐⭐⭐
There is something deeply satisfying about a diploma scroll cookie — it is the physical symbol of everything the graduate worked toward, rendered in butter and sugar. The shape is an elongated rectangle with the two short ends slightly rounded upward to suggest the scroll curl.
Decoration approach: Flood the center of the scroll in cream or off-white royal icing. While still wet, use a toothpick to add very thin lines of gold icing running horizontally across the center — these represent the text lines on a diploma. Add a red ribbon bow at the center using a piping bag with a small round tip, or press a small piece of red fondant ribbon into the wet icing so it sets in place. Pipe “Congratulations” or the graduate’s name across the scroll face using a fine tip.
Beginner shortcut: Skip the piped text and use a food-safe edible ink marker on the fully set white icing surface. Far easier than piping and produces remarkably clean results.
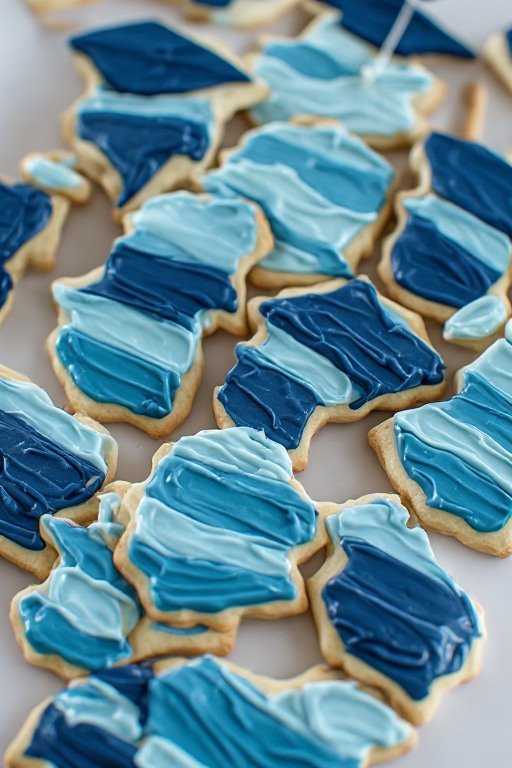
3. School Color Ombre Cookies
Skill Level: Intermediate | Wow Factor: ⭐⭐⭐⭐⭐
Cut simple circle or square cookies and decorate them in an ombre fade of the school’s two primary colors. Start with the darkest shade at the top, blend through mid-tones, and finish with the lightest at the bottom — or fade from one color to the other horizontally across the cookie.
Decoration approach: Prepare three shades of royal icing: dark, medium, and light (or two colors with a blended transition color). Apply the darkest shade to the top third of the flooded cookie while it is still wet. Immediately apply the mid-tone to the center and use a scribe tool or toothpick to drag gently between the colors in vertical strokes. Apply the lightest shade to the bottom and repeat the drag technique. Wet-on-wet blending is the key — everything must be applied while the icing underneath is still liquid.
Why these work so well at parties: These cookies look genuinely sophisticated on a dessert table without requiring advanced cookie decorating skills. The ombre effect is impressive visually but forgiving technically — even imperfect blending looks intentional and artistic.
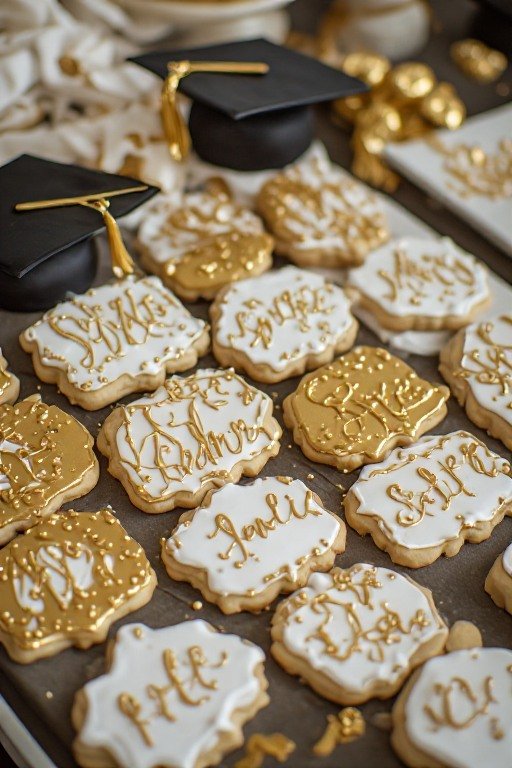
4. Personalized Name Cookies
Skill Level: Beginner | Wow Factor: ⭐⭐⭐⭐⭐
A cookie with the graduate’s name on it is perhaps the most personally meaningful decoration on this entire list. Cut a rectangle, plaque, or banner-shaped cookie, flood it in a neutral background color, let it dry completely, and write the graduate’s name in piped royal icing or edible food marker.
Decoration approach: Keep the background simple and elegant — white, cream, gold, or the school’s lighter color. Let it set overnight for the smoothest possible surface to write on. Use a fine-tip edible ink pen to write the name in cursive — this looks far more polished than block letters for a plaque style cookie. Add a small graduation cap or star stamp in one corner using a food-safe stamp and edible ink.
For bakery-style results: Use an edible image printer to print the graduate’s name, photo, or both directly onto a fondant sheet. Press the fondant sheet onto the flooded, set cookie and smooth gently. The result looks genuinely professional and takes the personalization to a level that hand-piping cannot match.
What makes these special: At a graduation party, a cookie with someone’s actual name on it creates a moment. Guests pick it up, show it to the graduate, take a photo together. It is a small thing that carries a lot of emotional weight.
5. Graduation Cap with Smiling Face Cookies
Skill Level: Beginner | Wow Factor: ⭐⭐⭐⭐
These are the cookies that children at graduation parties go absolutely wild for — and that adults pick up and smile at immediately. A round cookie with a simple smiley face wearing a tiny graduation cap on top. The face is drawn with a food-safe marker on a peach, tan, or pink flooded cookie background.
Decoration approach: Flood a round cookie in a skin tone — mix white icing with a tiny drop of orange or brown gel food coloring to achieve a warm, natural peach. Let set completely. Use a black edible ink marker to draw two dots for eyes, a curved line for the smile, and small curved lines for eyebrows. Place a small square of dark-colored fondant on the top of the face as the graduation cap, securing it with a dot of royal icing. Add a small tassel from a thin piece of fondant or piped icing.
Why they are irresistible: Something about a smiling face in a graduation cap is universally cheerful. These are the cookies that everyone photographs and nobody can resist eating.

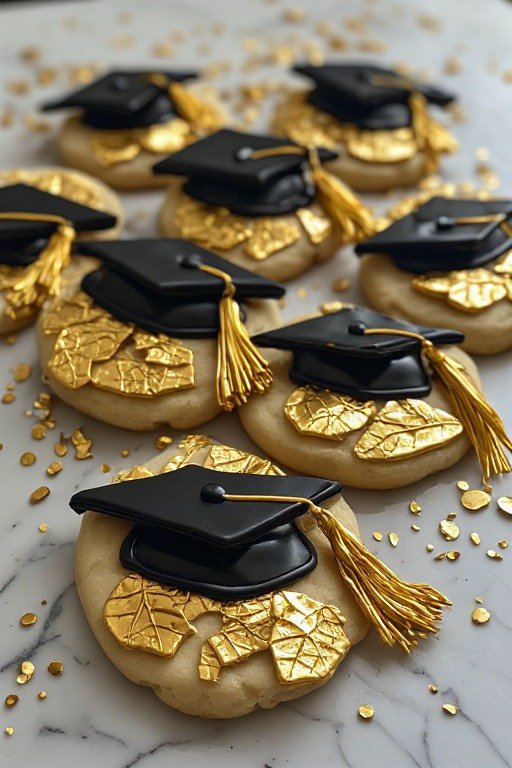
6. Gold Foil Graduation Cookies
Skill Level: Intermediate | Wow Factor: ⭐⭐⭐⭐⭐
Black and gold is arguably the most elegant graduation color combination in existence — and gold foil cookies make the most of it. The contrast between a deep black cookie surface and edible gold leaf or gold luster dust creates something that looks genuinely luxurious.
Decoration approach: Flood the cookie — graduation cap, star, or circle shapes work best — in black royal icing. Let dry completely, ideally overnight. Apply edible gold leaf by lightly brushing a thin layer of lemon extract or clear vanilla over the areas you want gilded, then carefully placing small pieces of edible gold leaf with a soft brush. Alternatively, mix gold luster dust with a tiny amount of lemon extract to create a paint and apply with a fine brush for a solid gold effect.
Design options: Gold cap on a black background. Gold star burst pattern on a navy cookie. “2026” lettered in gold on a deep emerald green background. A black cookie with gold confetti dot pattern piped while wet.
Where to buy edible gold leaf: Most cake decorating supply stores and online baking retailers carry edible gold leaf sheets. They are more affordable than they look and a little goes a very long way.
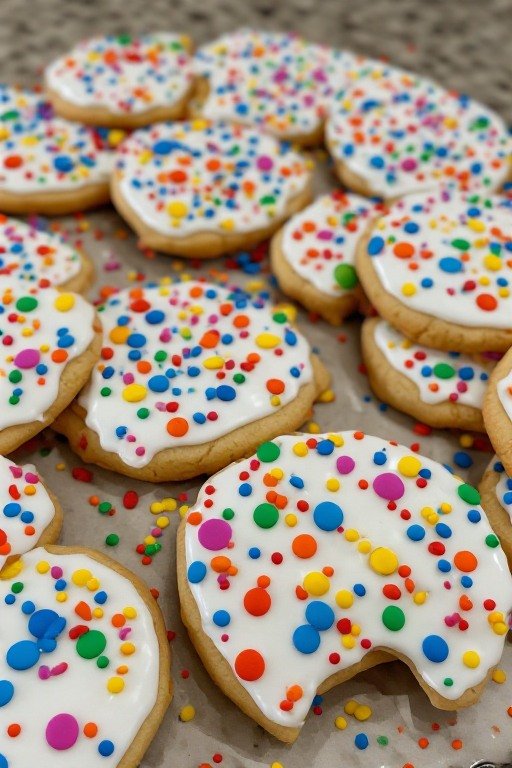
7. Confetti Celebration Cookies
Skill Level: Beginner | Wow Factor: ⭐⭐⭐⭐
Confetti cookies are one of the most cheerful, universally appealing graduation cookie designs — and they require almost no advanced decorating skill. A simple round or square cookie flooded in white, with multicolored confetti dots applied wet-on-wet before the icing sets.
Decoration approach: Flood the cookie in white royal icing. While completely wet, use small piping bags filled with school colors and white to pipe tiny dots randomly across the entire surface. Use a toothpick to drag gently through each dot to create the confetti burst shape — a single drag outward from each dot center creates a little comet-tail effect that looks like real confetti mid-fall.
Sprinkle shortcut: If piping individual dots feels too fussy, flood the cookie in white and immediately scatter confetti quins (flat circular sprinkles) over the wet surface. Press gently with a clean fingertip to ensure they adhere, then let set completely. This produces a genuinely festive result in a fraction of the time.
These work especially well alongside more elaborate designs on a dessert table — the cheerful simplicity of confetti cookies balances and complements the more detailed pieces without competing with them.
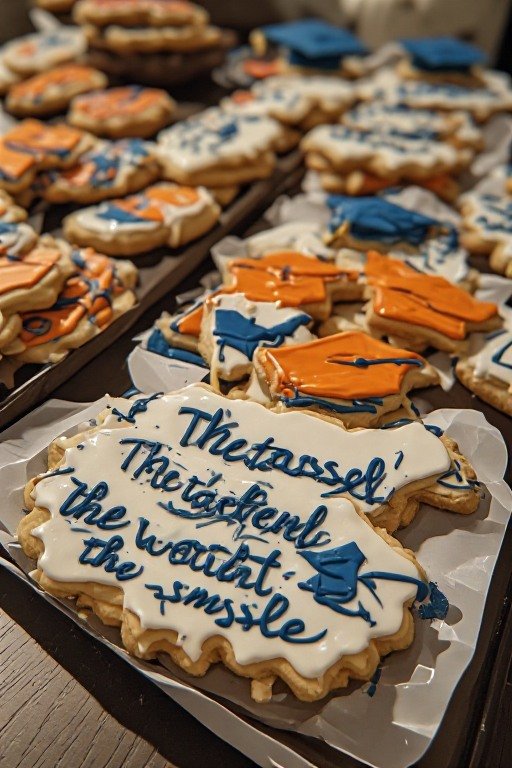
8. Tassel Worth the Hassle Cookies
Skill Level: Beginner | Wow Factor: ⭐⭐⭐
The phrase “The Tassel Was Worth the Hassle” has become one of the defining mottos of graduation culture — and it makes for an absolutely charming cookie design. A rectangle or banner-shaped cookie with the phrase written across it in royal icing or edible marker, decorated with a small tassel in the corner.
Decoration approach: Flood a rectangular cookie in the school’s primary color. Let dry. Write “The Tassel Was Worth the Hassle” in white or gold edible marker across the center. Add a small tassel detail in the bottom corner using piped icing strings — pipe 8 to 10 straight lines of the same length downward from a single point, with a small horizontal bar at the top to suggest the knot.
Alternative phrases for this design:
- “She Did It!”
- “Congrats Grad!”
- “Class of 2026”
- The graduate’s name plus graduation year
- “The Future is Bright”
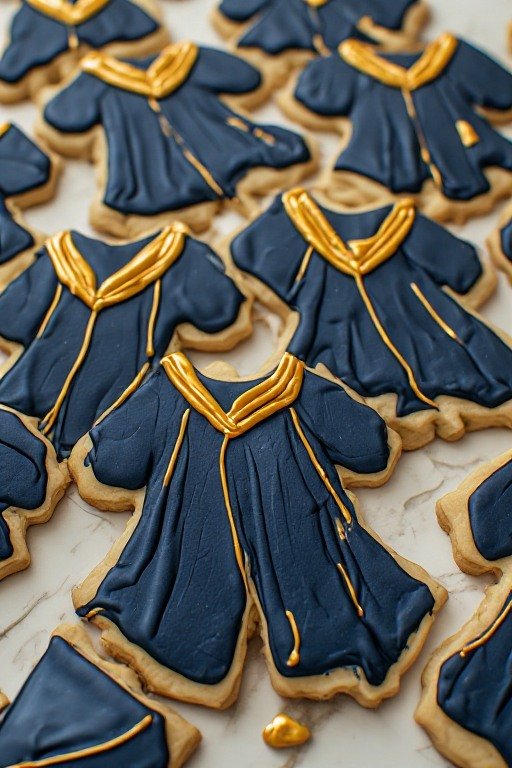
9. Graduation Gown Cookies
Skill Level: Intermediate | Wow Factor: ⭐⭐⭐⭐
A graduation gown cookie is one of the most dramatic shapes in decorated cookie design — tall, flowing, and immediately recognizable. These work best when made slightly larger than a typical cookie to give the gown shape room to be properly detailed.
Decoration approach: Flood the gown body in the school’s primary color — navy, black, maroon, or green. While wet, pipe a lighter shade of the same color or white in vertical waves down the center of the gown to suggest the gathering and flow of the fabric. Add a white or cream collar area at the neckline. Let set. Pipe thin gold or silver lines along the collar edges and sleeve cuffs to suggest academic trim. Add a small graduation cap at the top using a square of dark fondant.
Display tip: Graduation gown cookies look particularly beautiful standing upright in a cookie bouquet arrangement — the gown shape reads clearly from a distance and creates an immediate visual impression on a dessert table.
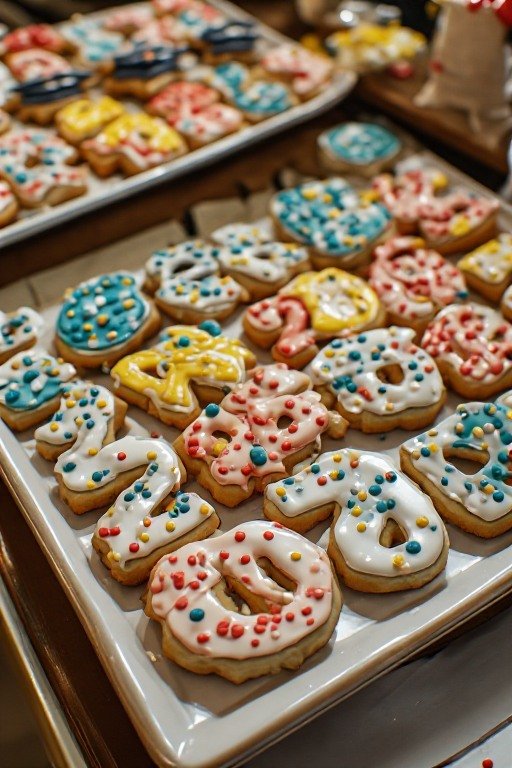
10. “Class of 2026” Number Cookies
Skill Level: Beginner | Wow Factor: ⭐⭐⭐⭐
Cut the individual numbers 2, 0, 2, and 6 using number cookie cutters and decorate them as a set — each cookie flooded in a different school color, or all in matching colors with different detail patterns. Displayed together on a stand or platter, they read immediately as a graduation year and make a genuinely striking centerpiece on a dessert table.
Decoration approach: Each number gets a solid flood in the school’s colors. While wet, add patterns: polka dots on the first number, stripes on the second, ombre on the third, glitter on the fourth. Or keep all four uniform for a cleaner, more modern look. Add small graduation cap or star accents while the main flood is still wet using a contrasting color.
Gifting idea: Package the four number cookies in a clear acetate box tied with ribbon in the school colors. A set of “2026” cookies makes an outstanding, completely unique graduation gift that takes less than an hour to put together once the cookies are decorated.
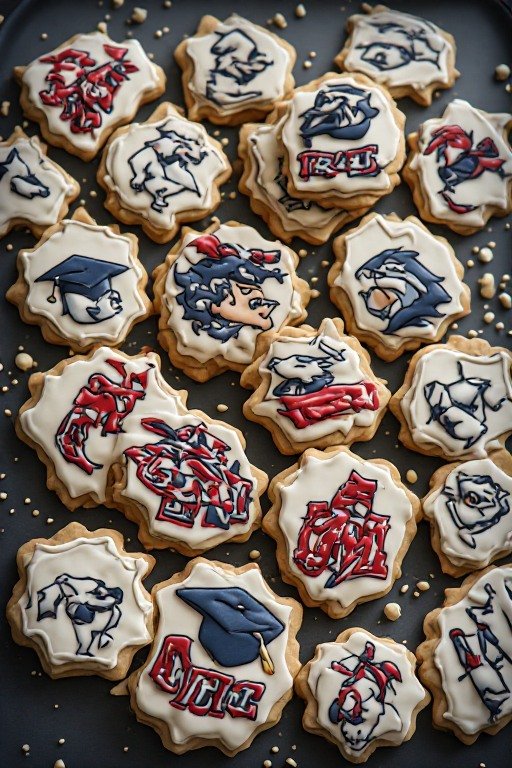
11. School Logo and Mascot Cookies
Skill Level: Advanced (with stencils: Intermediate) | Wow Factor: ⭐⭐⭐⭐⭐
Cookies decorated with the graduate’s actual school logo or mascot are the most personalized option on this list — and the most impressive. These require either advanced piping skills, a custom food-safe stencil, or an edible image printer.
Stencil approach: Order or create a custom stencil of the school logo. Flood the cookie in white and let set completely. Hold the stencil firmly over the set cookie and apply royal icing or airbrush edible color through the stencil openings. Remove carefully and let set. This approach requires a steady hand but produces consistent, repeatable results.
Edible image approach: Print the school logo on an edible image sheet using a food-safe edible ink printer. Cut to size and place on a freshly flooded, still-wet cookie — the wet icing anchors the image as it dries. This produces the most accurate color reproduction and is the preferred approach for complex logos.
Ordering from a bakery: For school logo cookies specifically, ordering from a professional bakery with an edible image printer is often the most practical decision. The results will be sharper and more accurate than any home method.
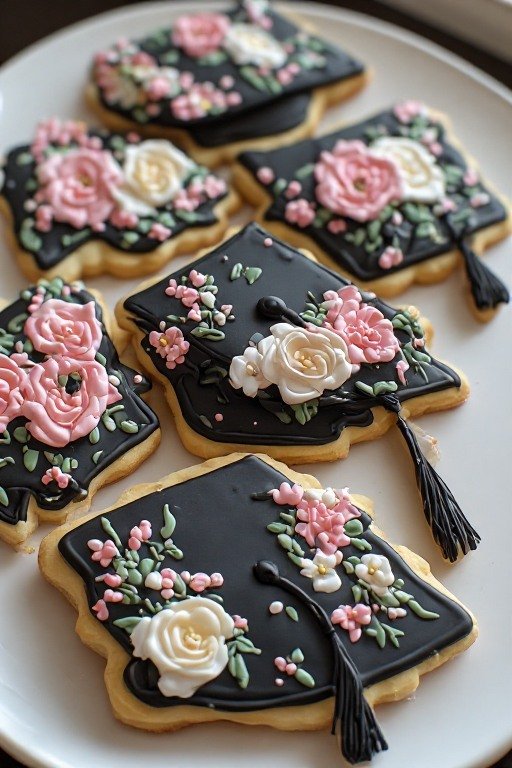
12. Floral Graduation Cap Cookies
Skill Level: Intermediate | Wow Factor: ⭐⭐⭐⭐⭐
A graduation cap decorated with tiny painted or piped flowers has become one of the most popular trends in graduation cookie design — and it is easy to understand why. The combination of the structured, formal cap shape with delicate, romantic florals creates a genuinely beautiful contrast.
Decoration approach: Flood the cap in black or a deep school color. Let dry overnight. Using a very fine brush and gel food coloring mixed with a tiny amount of lemon extract to create a paint, hand-paint small flowers across the cap surface — tiny roses, daisies, or cherry blossoms are the most manageable for beginners. Add small green leaves between the flowers. Alternatively, pipe small royal icing flowers (made in advance and dried separately) onto the set cap surface using a dot of fresh royal icing as adhesive.
Color palette suggestions: Black cap with pink and white flowers. Navy cap with lavender and cream florals. Gold cap with white and blush flowers for a particularly elegant result.
Why these photograph so beautifully: The combination of the dark cap background and delicate light-colored flowers creates natural contrast that photographs exceptionally well. These are consistently the most-photographed cookies at any graduation dessert table.
13. Gold Star “You’re a Star” Cookies
Skill Level: Beginner | Wow Factor: ⭐⭐⭐⭐
Simple, cheerful, and completely fail-proof for beginner decorators. Cut star shapes and decorate them in gold — flooded with gold royal icing, brushed with gold luster dust, or covered with gold fondant. Add “You’re a Star!” or the graduate’s name in white or black.
Decoration approach: Mix gold luster dust into your royal icing for a subtle metallic sheen, or flood the star in yellow and brush gold luster dust mixed with lemon extract over the fully set surface for a more dramatic metallic finish. The brush-on method produces a noticeably more brilliant, mirror-like gold than luster dust mixed directly into the icing.
Why stars work for graduation: Stars require no specific cookie cutter beyond the basic star shape available in every grocery store baking aisle. They are universally recognizable as celebratory. They look stunning in gold. And they are genuinely easy for beginner decorators — no complex shapes, no difficult outlines, no multi-step flooding.
Display idea: Mix different sizes of gold star cookies — small, medium, and large — and arrange them in a cluster on a cake stand. The varying sizes create visual interest and the all-gold palette looks cohesive and sophisticated.

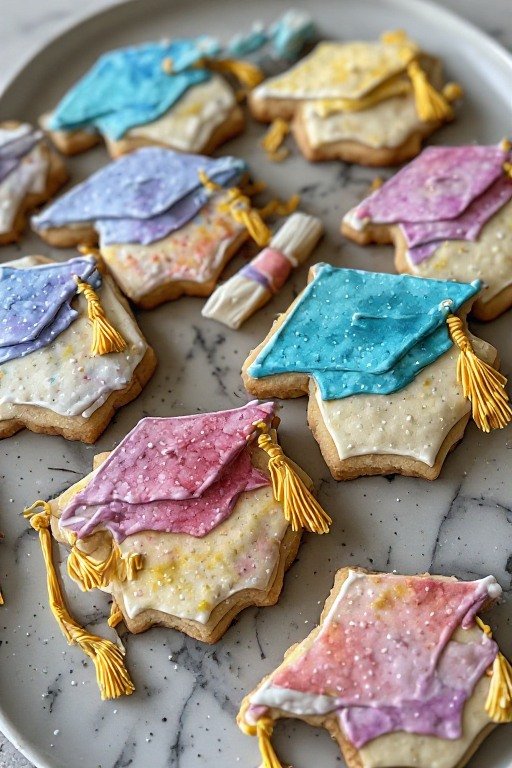
14. Watercolor Painted Graduation Cookies
Skill Level: Intermediate | Wow Factor: ⭐⭐⭐⭐⭐
Watercolor cookies have become one of the most popular decorated cookie trends — and for graduation specifically, they look extraordinarily beautiful when done in the graduate’s school colors. The soft, painterly effect looks both artistic and elegant.
Decoration approach: Flood the cookie — round, square, or graduation cap shapes work beautifully — in white royal icing. Let set completely and very smoothly. Mix gel food coloring in the school’s colors with lemon extract to create a thin, watercolor-consistency paint. Using a clean, slightly damp soft brush, apply the color in light, uneven strokes across the white surface — do not try to control it too precisely. The variations in coverage and the slightly translucent quality of the color is the whole point. Let dry. Add graduation details — a piped cap, a name, a “2026” — on top once the watercolor layer is fully dry.
Color combinations for graduation: Navy and gold watercolor. Maroon and cream. Forest green and silver. Purple and gold. The watercolor technique works with any color combination and always looks beautiful.
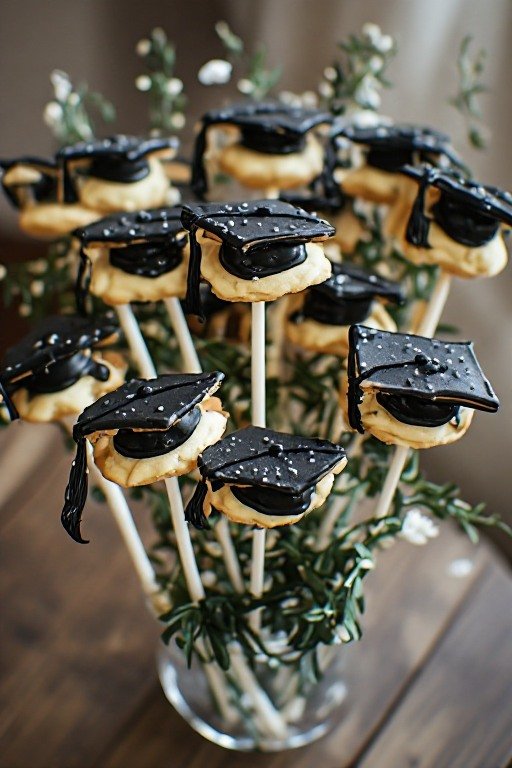
15. Mini Graduation Cap Cookie Pops
Skill Level: Intermediate | Wow Factor: ⭐⭐⭐⭐⭐
Cookie pops — decorated cookies mounted on sticks — are one of the most practical and visually impactful presentation options for a graduation party. They can be displayed upright in a foam block wrapped in decorative paper, arranged in a vase as a cookie bouquet, or handed directly to guests as a party favor.
How to make them: Before baking, insert a lollipop stick or wooden cookie stick into the bottom of each cut cookie shape, pressing it approximately halfway up the cookie. The stick must go in before baking — trying to insert it after the cookie is cooked cracks the cookie. Bake as normal — the stick will be secure when the cookie cools. Decorate as a standard graduation cap cookie after cooling completely.
Display options: Stand them upright in a block of floral foam covered with tissue paper or moss inside a decorative container. Group them in bundles of three tied with ribbon in school colors. Wrap individual pops in clear cellophane bags secured with ribbon for take-home party favors.
Cookie pop tip: Use a thicker cookie dough recipe for cookie pops — approximately 6mm (¼ inch) thick rather than the standard 5mm. The extra thickness provides more structural support around the stick and prevents cracking during and after baking.
16. “She Did It” Balloon Letter Cookies
Skill Level: Beginner | Wow Factor: ⭐⭐⭐⭐
Cut individual letters to spell out “SHE DID IT,” “HE DID IT,” or “THEY DID IT” and decorate each letter like a balloon — solid bright colors, a small white highlight dot in the corner to suggest shine, and a thin piped string at the bottom. Displayed together on a table, they create a statement that reads from across the room.
Decoration approach: Each letter gets a different color flood — rotate through school colors or use a rainbow of bright celebration colors. While the flood is still wet, pipe a small circle of white royal icing in the upper corner of each letter and drag it slightly into a tear-drop shape to create the balloon shine effect. Once set, pipe a thin curved line in dark brown or black at the bottom of each letter to suggest the balloon string.
Arrangement: Display the letter cookies spelling the phrase in a line on a cake stand, propped against a simple wire cookie display stand, or laid flat on a table runner. Surround with confetti cookies and gold star cookies for a complete cookie dessert table display.

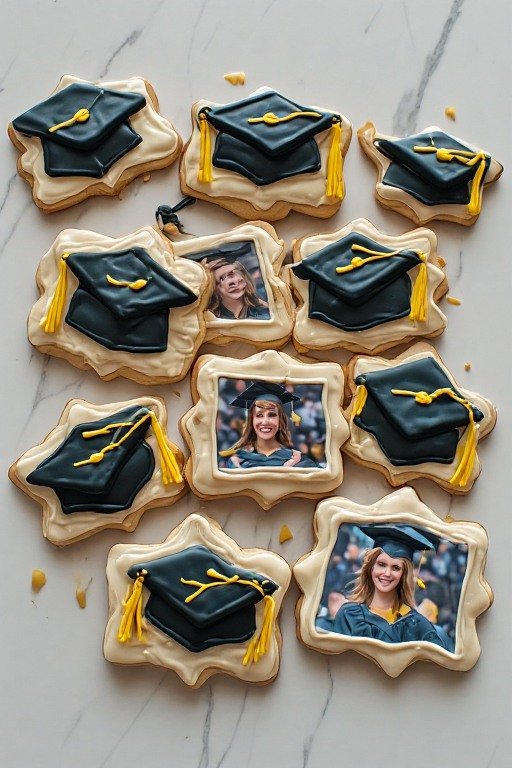
17. Graduation Photo Frame Cookies
Skill Level: Beginner | Wow Factor: ⭐⭐⭐⭐⭐
A photo frame shaped cookie with a small edible image of the graduate printed in the center is one of the most genuinely touching and personalized graduation cookie ideas on this list. These are the ones that get kept on display long after the party, that guests take home and save rather than eat immediately.
Decoration approach: Cut a rectangle cookie with a slightly smaller rectangle cut out of the center — this creates the frame shape. Flood the frame border in the school’s colors or a decorative pattern. Let set. Place a printed edible image of the graduate (sized to fit the center opening) behind the frame — secure it with a small amount of royal icing around the edges. The edible photo sits flush inside the frame like a proper picture.
Edible image printing: Most local bakeries with edible image printers will print edible photo sheets for a small fee if you provide the image file. You do not need to order the decorated cookies from them — just the printed sheets. Alternatively, home edible image printers have become more affordable and accessible for regular bakers.
Why these are so special: A cookie with the graduate’s actual face inside a decorated frame is unlike any other graduation party treat. It is the one cookie design that genuinely stops people in their tracks.
18. Cookie Gift Box Sets
Skill Level: Beginner (assembly) | Wow Factor: ⭐⭐⭐⭐⭐
This final idea is less about a single cookie design and more about the most beautiful and practical way to present graduation cookies as gifts or party favors. A curated set of 4 to 6 decorated graduation cookies — a cap, a diploma, a star, a personalized name cookie, a “2026” number, and a confetti cookie — packaged in a clear window gift box with ribbon in school colors.
What to include in the set:
- 1 graduation cap cookie in school colors
- 1 diploma scroll cookie
- 1 personalized name cookie with the graduate’s name
- 1 gold star cookie
- 1 confetti celebration cookie
- 1 “Class of 2026” cookie
Packaging: Clear acetate boxes with hinged lids are available at most craft stores and baking supply shops. Line the bottom with tissue paper or food-safe parchment in school colors. Arrange the cookies in a single layer — do not stack, as royal icing can chip when cookies press against each other. Tie the closed box with a wide satin ribbon in the school’s primary color and add a handwritten tag with the graduate’s name and year.
Why this is the best graduation gift: A beautifully packaged set of personalized graduation cookies is something a graduate can display, photograph, share, and treasure. It requires thought, time, and care to produce — and the recipient knows it immediately.

Tips for Making Graduation Cookies in Large Batches
Work in stages over two to three days. Day one: bake all the cookies and let them cool completely. Day two: apply base flood coats and let dry overnight. Day three: add details, text, and finishing elements. Trying to rush all three stages into one day produces stressed, hurried work and inconsistent results.
Color your royal icing with gel food coloring only. Liquid food coloring adds too much water to the icing and changes its consistency significantly — it becomes too thin for flooding and too runny for piping. Gel coloring is concentrated and adds intense color with only a tiny amount, leaving the icing consistency unchanged.
Make extra icing and extra cookies. Breakage and decorating mistakes are inevitable at any scale. Bake at least 20% more cookies than you need and mix more icing than you think you will use. Running short of either during a large batch is genuinely frustrating and often unavoidable without this buffer.
Package immediately after the icing is fully set. Once the royal icing has dried completely — typically 8 to 12 hours for a thick flood coat — package the cookies in individual cellophane bags or store in a single layer between sheets of parchment paper in an airtight container. Stacking unpackaged cookies against each other chips and scratches the icing.
Store at room temperature, never in the refrigerator. Refrigerator moisture causes royal icing to become sticky and discolored. Decorated cookies store best in an airtight container at room temperature for up to 2 weeks — longer than most people expect.
Graduation Cookie Color Palettes by School Type
| School Type | Classic Colors | Elegant Palette | Fun Palette |
|---|---|---|---|
| High School | School colors | Black and gold | Rainbow confetti |
| College | School colors | Navy and cream | School colors + white |
| Medical/Nursing | Blue and white | Navy and gold | Scrubs blue + stethoscope |
| Law School | Navy and burgundy | Black and gold | Green and gold |
| Kindergarten | Bright primary colors | Pastel rainbow | Yellow and red |
Ordering Graduation Cookies from a Bakery
If decorating your own graduation cookies is not an option, ordering from a professional bakery produces the most impressive results — but there are a few important things to know before you place an order.
Order at least 2 to 3 weeks in advance. Custom decorated cookie orders require significant lead time — most bakeries close their books for graduation season 3 to 4 weeks out. Placing your order in April for a May or June graduation is strongly recommended.
Provide school colors in hex codes or Pantone references. The more specific you can be about exact colors, the closer the finished cookies will match what you envisioned. “Blue and gold” can mean many things. “Navy PMS 289 and old gold PMS 137” leaves no ambiguity.
Request a sample or proof image before full production. Most professional cookie decorators will send a digital proof or complete one sample cookie for approval before decorating the full order. Always ask for this, especially for personalized or logo cookies.
Plan for a minimum order. Most custom cookie decorators require a minimum order of 12 to 24 cookies per design. Smaller quantities often carry a higher per-cookie cost.
Frequently Asked Questions
How far in advance can I make graduation cookies? Decorated sugar cookies with royal icing keep fresh for up to 2 weeks at room temperature in an airtight container. For maximum freshness, bake and decorate 3 to 5 days before the party. The cookies are at their absolute best within this window — the sugar cookie stays soft and the royal icing is perfectly crisp.
How many cookies do I need per guest? Plan for 2 to 3 cookies per adult guest at a party where multiple desserts are served, or 3 to 4 per person if cookies are the primary dessert. For gift box sets, one box per household or per significant guest is standard.
Can I freeze decorated graduation cookies? Yes, with care. Place fully decorated and set cookies in a single layer on a parchment-lined baking sheet. Freeze uncovered until solid — about 2 hours. Stack in an airtight container between layers of parchment paper and freeze for up to 3 months. To thaw, remove from the container and let come to room temperature still in their packaging or in a single layer — the condensation that forms needs to evaporate without touching the cookie surface directly, which would make the icing sticky.
What is the best way to display graduation cookies at a party? A tiered cookie stand or cake stand creates height and visual impact. A flat board or platter lined with parchment or a decorative cloth works for a more casual display. For cookie pops, a foam block wrapped in tissue paper inside a decorative container stands them upright beautifully. Mix different designs together on the same display rather than grouping identical cookies — variety makes the table more visually interesting.
Can a beginner decorate graduation cookies? Absolutely. Several designs on this list — confetti cookies, gold star cookies, “tassel” phrase cookies decorated with edible marker, and name plaque cookies — require minimal decorating skill and produce genuinely impressive results. Start with a single simple design for your first attempt, master the flooding technique, and build from there.